(P0) GGUF,GGML,llama.cpp
动机、参考资料、涉及内容
涉及内容: GGUF 文件格式, llama.cpp, GGML
简介
GGML(GPT-Generated Model Language) 是一个开源项目(可以类比 pytorch), 用于高效的利用 CPU 进行张量计算, 项目定义了一种 GGUF(GPT-Generated Unified Format) 文件格式. GGML 的作者也同样是 llama.cpp 的作者, 而 llama.cpp 用于高效的利用 CPU 进行市面上流行的许多开源大模型的推理.
目前看 GGML 和 llama.cpp 项目没有依赖关系, 因此可能有代码会重复?
如果只希望快速部署一些开源大模型, 一般只需要关心 llama.cpp 即可, 具体例子见下节
llama.cpp Quick Start
普通的算法工程师一般只需要知道按如下方式部署一个现成的模型
参考: https://huggingface.co/Qwen/Qwen2.5-1.5B-Instruct-GGUF, 步骤如下:
git clone --depth=1 -b master https://github.com/ggerganov/llama.cpp.git
cd llama.cpp
# 编译可执行文件
make -j8
# 下载 gguf 文件
huggingface-cli download Qwen/Qwen2.5-1.5B-Instruct-GGUF qwen2.5-1.5b-instruct-q5_k_m.gguf --local-dir . --local-dir-use-symlinks False
# 运行一个命令行交互的简单 demo
./llama-cli -m qwen2.5-1.5b-instruct-q5_k_m.gguf -co -cnv -p "You are Qwen, created by Alibaba Cloud. You are a helpful assistant." -fa -ngl 80 -n 512
更深入的情况是:
- Q1: 如果只有
xx.safetensor(pytorch_model.bin) 这种形式的权重, 怎么转换为 GGUF 格式? 反之如何? - A1: 如果模型结构被 convert_hf_to_gguf.py 脚本支持, 那么直接用脚本进行
safetensor->gguf的转换, 而 huggingface transformersfrom_pretrained方法自带支持从gguf-内存float模型的转换(实际上也就是包装了下gguf-py里的dequant方法), 然后再将模型文件保存即可 - Q2: 如果模型结构不被支持呢?
- A2: 可以修改
convert_hf_to_gguf.py文件, 其实如果你这么做了, 你事实上可以为 llama.cpp 提 PR, 实际做起来你可能需要参考 HOWTO-add-model.md - Q3: 如果你很想知道 GGUF 文件的具体格式, 以探索用 GGUF 文件存储别的东西, 或者做更多的事情
- A3: 请看下文
通常情况下, 至多只需要知道 A1 即可: 一般是你对模型做了微调, 需要自己转换格式, 但一般来说也就是用 huggingface transformers 进行微调, 而它大概也继承了这个转换脚本, 因此甚至于不需要知道 A1.
GGUF 文件格式
- GGML 文档 (最官方的描述): https://github.com/ggerganov/ggml/blob/master/docs/gguf.md
- huggingface hub 文档: https://huggingface.co/docs/hub/en/gguf
llama.cpp 项目下包含一个子项目: gguf-py (pypi:gguf), 这个子项目是纯 python 实现 GGUF 文件的读写, 因此可以用来了解 GGUF 的文件格式.
TODO: llama.cpp 里实际使用的应该是 C 语言的实现, 待搜寻
初体验: 读取一个实际的 GGUF 文件
cd /path/to/llama.cpp/gguf-py
pip install -e .
python examples/reader.py ../qwen/qwen2.5-1.5b-instruct-q5_k_m.gguf
可以得到这样的输出(省略了许多层)
Key-Value Pairs:
GGUF.version                           : [3]
GGUF.tensor_count                      : [339]
GGUF.kv_count                          : [26]
general.architecture                   : [113 119 101 110  50]
general.type                           : [109 111 100 101 108]
general.name                           : [113 119 101 110  50  46  53  45  49  46  53  98  45 105 110 115 116 114 117  99 116]
general.version                        : [118  48  46  49]
general.finetune                       : [113 119 101 110  50  46  53  45  49  46  53  98  45 105 110 115 116 114 117  99 116]
general.size_label                     : [49 46 56 66]
qwen2.block_count                      : [28]
qwen2.context_length                   : [32768]
qwen2.embedding_length                 : [1536]
qwen2.feed_forward_length              : [8960]
qwen2.attention.head_count             : [12]
qwen2.attention.head_count_kv          : [2]
qwen2.rope.freq_base                   : [1000000.]
qwen2.attention.layer_norm_rms_epsilon : [1.e-06]
general.file_type                      : [17]
tokenizer.ggml.model                   : [103 112 116  50]
tokenizer.ggml.pre                     : [113 119 101 110  50]
tokenizer.ggml.tokens                  : [33]
tokenizer.ggml.token_type              : [1]
tokenizer.ggml.merges                  : [196 160  32 196 160]
tokenizer.ggml.eos_token_id            : [151645]
tokenizer.ggml.padding_token_id        : [151643]
tokenizer.ggml.bos_token_id            : [151643]
tokenizer.ggml.add_bos_token           : [False]
tokenizer.chat_template                : [123  37  45 ...  37 125  10]
general.quantization_version           : [2]
----
Tensors:
Tensor Name                    | Shape: Shape           | Size: Size         | Quantization: Quantization
--------------------------------------------------------------------------------
output.weight                  | Shape: 1536x151936     | Size: 233373696    | Quantization: Q6_K
token_embd.weight              | Shape: 1536x151936     | Size: 233373696    | Quantization: Q5_K
blk.0.attn_norm.weight         | Shape: 1536            | Size: 1536         | Quantization: F32
blk.0.ffn_down.weight          | Shape: 8960x1536       | Size: 13762560     | Quantization: Q6_K
blk.0.ffn_gate.weight          | Shape: 1536x8960       | Size: 13762560     | Quantization: Q5_K
blk.0.ffn_up.weight            | Shape: 1536x8960       | Size: 13762560     | Quantization: Q5_K
blk.0.ffn_norm.weight          | Shape: 1536            | Size: 1536         | Quantization: F32
blk.0.attn_k.bias              | Shape: 256             | Size: 256          | Quantization: F32
blk.0.attn_k.weight            | Shape: 1536x256        | Size: 393216       | Quantization: Q5_K
blk.0.attn_output.weight       | Shape: 1536x1536       | Size: 2359296      | Quantization: Q5_K
blk.0.attn_q.bias              | Shape: 1536            | Size: 1536         | Quantization: F32
blk.0.attn_q.weight            | Shape: 1536x1536       | Size: 2359296      | Quantization: Q5_K
blk.0.attn_v.bias              | Shape: 256             | Size: 256          | Quantization: F32
blk.0.attn_v.weight            | Shape: 1536x256        | Size: 393216       | Quantization: Q6_K
...
output_norm.weight             | Shape: 1536            | Size: 1536         | Quantization: F32
这些输出可以与huggingface-hub的显示进行对照, 两者本质是完全一致的, 只是 huggingface-hub 上的显示更为友好一些, 例如:
# general.architecture: [113 119 101 110  50]
x = [113, 119, 101, 110, 50]
assert "".join([chr(_) for _ in x]) == "qwen2"
GGUF 与 Pytorch 相互转化, 可以参考: https://huggingface.co/docs/transformers/v4.45.2/en/gguf
# 利用 transformers 将 GGUF 转化为普通的 Pytorch Module 的 state_dict: 本质上也是利用 gguf python 包: from gguf import GGUFReader, dequantize
from transformers import AutoModelForCausalLM
import os
path = "/path/to/qwen/qwen2.5-1.5b-instruct-q5_k_m.gguf"
model = AutoModelForCausalLM.from_pretrained(os.path.dirname(path), gguf_file=path)  # 转化后是普通版本 float 权重的模型

# 将 transformers 的 Pytorch Module 权重文件转化为 GGUF 格式: 本质上是一个模型一个模型去与 huggingface 对齐的, 实质上也是使用了 GGUFWriter
https://github.com/ggerganov/llama.cpp/blob/master/convert_hf_to_gguf.py
接下来, 我们将深入理解读取过程, 从而理解 GGUF 的数据排布方式
前置知识: numpy 与 C 结构体的文件读写
隐藏
numpy: memmap 与 .npy 文件
import numpy as np
import struct

# memmap
nrows, ncols = 2, 3
arr = np.memmap('arr.dat', dtype=np.int32, mode='w', shape=(nrows, ncols))
arr[0][0] = 1
arr[0][1] = 2
arr[0][2] = 3
arr[1][0] = 4
arr[1][1] = 5
arr[1][2] = 6
arr.flush()

with open('arr.dat', "rb") as fr:
    x = fr.read()

struct.unpack("6I", x)  # (1, 2, 3, 4, 5, 6)


# npy 文件
with open("arr.npy", "wb") as fw:
    np.save(fw, np.array([1, 2, 3, 4], dtype=np.int32))
with open("arr.npy", "rb") as fr:
    x = fr.read()  # b"\x93NUMPY\x01\x00v\x00{'descr': '<i4', 'fortran_order': False, 'shape': (4,), }
len(x)  # 144
以上示例代码有如下要点:
np.memmap写入的内容只包含纯数据, 而.npy文件还包含了一些额外信息numpy数组是行优先存储的
C 语言结构体写入文件
#include <stdio.h>
#include <string.h>

struct MyStruct {
    int id;
    float value;
    char name[20];
};

int write_example() {
    struct MyStruct example;

    example.id = 1;
    example.value = 10.5;
    snprintf(example.name, sizeof(example.name), "ExampleName");

    // 打开文件以二进制写入模式
    FILE *file = fopen("data.bin", "wb");
    if (!file) {
        perror("Failed to open file");
        return 1;
    }

    // 将结构体写入文件
    fwrite(&example, sizeof(struct MyStruct), 1, file);

    // 关闭文件
    fclose(file);

    printf("Structure saved to binary file.\n");
    return 0;
}

int read_example() {
    struct MyStruct example_read;
    FILE *file = fopen("data.bin", "rb");
    if (!file) {
        perror("Failed to open file");
        return 1;
    }

    fread(&example_read, sizeof(struct MyStruct), 1, file);
    fclose(file);

    printf("ID: %d, Value: %f, Name: %s\n", example_read.id, example_read.value, example_read.name);
    return 0;
}

int main() {
    write_example();
    read_example();
    return 0;
}
使用 python 读取文件
import numpy as np
with open("data.bin", "rb") as fr:
    x = fr.read(4) # 32 位整数
    y = fr.read(4) # 浮点数
    z = fr.read()  # 长度为 20

np.frombuffer(x, dtype=np.int32)   # array([1], dtype=int32)
np.frombuffer(y, dtype=np.float32) # array([10.5], dtype=float32)
"".join([chr(x) for x in np.frombuffer(z, dtype=np.uint8)])  # 'ExampleName\x00\x00\x00\x00\x00 á\x1d*'
GGUF 文件数据排布
reader.py 详解: GGUF 文件的内容格式如下图所示
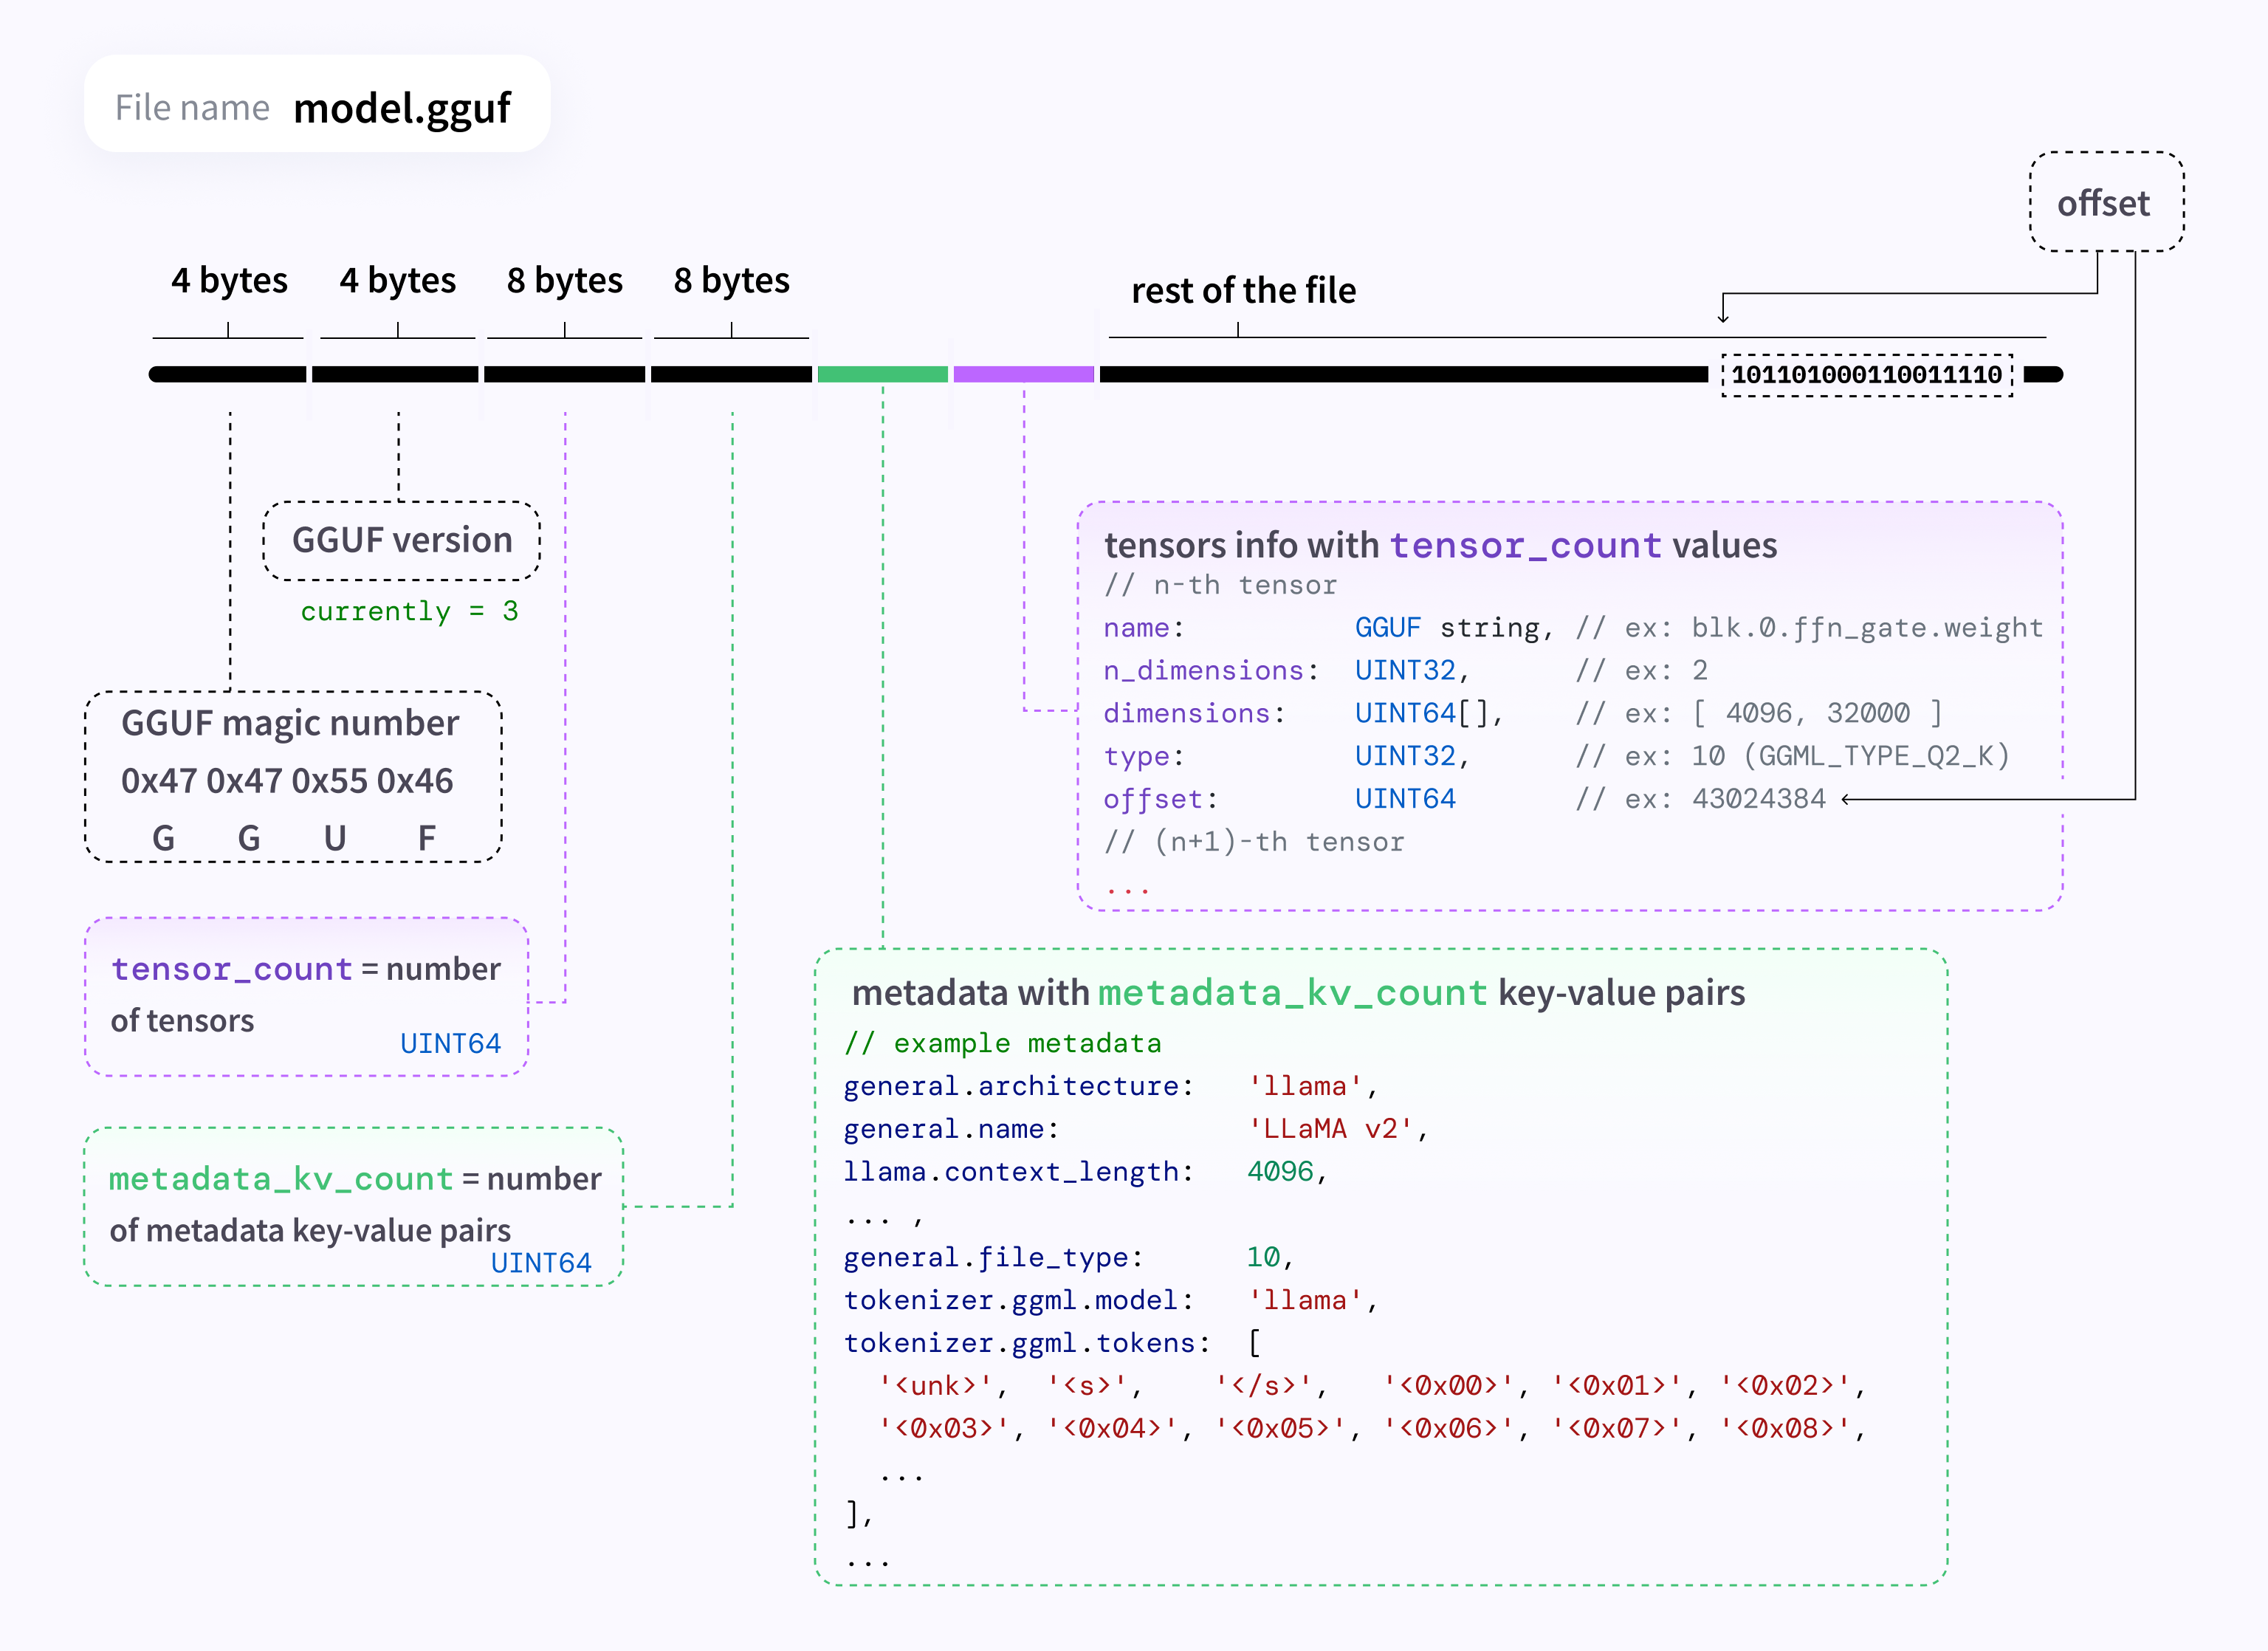
以下为文件内容的 Overview (精确描述)
- 文件的前 4 个字节以 uint32 按 Little Endian 读取必须是 GGUF
- 接下来的 4 个字节以 uint32 按系统默认的字节序读取, 得到版本号(目前是3), 并同时得知后续内容中文件的字节序是 Big Endian 还是 Little Endian
- 接下来的 8 个字节代表 metadata 总共有几个
- 接下来的 8 个字节代表 tensor 总共有几个
- metadata 的实际数据内容
- tensor 的元信息, 例如数据类型, 数据个数, 起始位置
- padding: 字节对齐, 使得第一个 tensor 的起始位置是字节对齐的
- tensor 的实际数据内容, 每个 tensor 结尾都需要 padding 用于字节对齐
其准确的数据排布定义于 https://github.com/ggerganov/ggml/blob/master/docs/gguf.md 文件内
个人注释版
// GGUF 所支持的 tensor 数据类型
enum ggml_type: uint32_t {
    GGML_TYPE_F32     = 0,  // float32 类型
    GGML_TYPE_F16     = 1,  // float16 类型
    GGML_TYPE_Q4_0    = 2,
    // ...
    GGML_TYPE_IQ1_M   = 29,
    GGML_TYPE_COUNT,
};

// GGUF 文件中 value 的数据类型
enum gguf_metadata_value_type: uint32_t {
    GGUF_METADATA_VALUE_TYPE_UINT8 = 0,
    GGUF_METADATA_VALUE_TYPE_INT8 = 1,
    GGUF_METADATA_VALUE_TYPE_UINT16 = 2,
    GGUF_METADATA_VALUE_TYPE_INT16 = 3,
    GGUF_METADATA_VALUE_TYPE_UINT32 = 4,
    GGUF_METADATA_VALUE_TYPE_INT32 = 5,
    GGUF_METADATA_VALUE_TYPE_FLOAT32 = 6,
    GGUF_METADATA_VALUE_TYPE_BOOL = 7,
    GGUF_METADATA_VALUE_TYPE_STRING = 8,
    GGUF_METADATA_VALUE_TYPE_ARRAY = 9,
    GGUF_METADATA_VALUE_TYPE_UINT64 = 10,
    GGUF_METADATA_VALUE_TYPE_INT64 = 11,
    GGUF_METADATA_VALUE_TYPE_FLOAT64 = 12,
};

// GGUF 文件中的字符串数据结构: len 代表长度, 然后跟着实际的字符串数据
struct gguf_string_t {
    uint64_t len;
    char string[len];
};

// GGUF 文件中 metadata 的 value 实际值的数据结构
union gguf_metadata_value_t {
    // 数值类型: 直接存值
    uint8_t uint8;
    int8_t int8;
    uint16_t uint16;
    int16_t int16;
    uint32_t uint32;
    int32_t int32;
    float float32;
    uint64_t uint64;
    int64_t int64;
    double float64;
    bool bool_;
    // 字符串类型: 先存长度, 再存值
    gguf_string_t string;
    // 数组类型: 先存元素类型, 再存元素个数, 最后存值
    struct {
        gguf_metadata_value_type type;
        uint64_t len;
        gguf_metadata_value_t array[len];
    } array;
};

// GGUF 文件中一项 metadata 的 kv 对的数据结构: 先存key,再存value的数据类型,最存value的值
struct gguf_metadata_kv_t {
    gguf_string_t key;
    gguf_metadata_value_type value_type;
    gguf_metadata_value_t value;
};

// GGUF 文件头部分
struct gguf_header_t {
    uint32_t magic;  // "GGUF" 的字节表示: 0x47475546
    uint32_t version;  // 目前是 3
    uint64_t tensor_count;  // 文件中 tensor 的数量
    uint64_t metadata_kv_count;  // 文件中 metadata 的数量
    gguf_metadata_kv_t metadata_kv[metadata_kv_count];  // metadata
};

// 字节对齐: 每个 tensor data 的起始位置必须是 ALIGNMENT 的整数倍
uint64_t align_offset(uint64_t offset) {
    return offset + (ALIGNMENT - (offset % ALIGNMENT)) % ALIGNMENT;
}

// GGUF 文件的一项 tensor info 的数据结构
struct gguf_tensor_info_t {
    gguf_string_t name;  // tensor 的名称
    uint32_t n_dimensions;  // tensor 的维度, 目前最大是 4
    uint64_t dimensions[n_dimensions];  // tensor 的 shape.
    ggml_type type;  // tensor 的数据类型
    uint64_t offset;  // 相较于 gguf_file_t.tensor_data 的 offset
};


// GGUF 文件
struct gguf_file_t {
    gguf_header_t header;  // GGUF 文件头部分
    gguf_tensor_info_t tensor_infos[header.tensor_count];  // tensor info
    // 字节对齐
    uint8_t _padding[];
    // tensor 的实际值, 每个 tensor 的起始位置必须是 ALIGNMENT 的整数倍(字节对齐)
    uint8_t tensor_data[];
};
GGUFReader 详解
以 qwen2.5-1.5b-instruct-q5_k_m.gguf 文件为例, 阅读 gguf.GGUFReader 的 __init__ 方法
本质上是按顺序解析
- (1) 头部
- (2) metadata
- (3) tensor info
- (4) tensor data
(1) 头部
共 4+4+8+8=24 个字节, GGUFReader 最终会在 self.fields 里增加 "GGUF.version", "GGUF.tensor_count", "GGUF.kv_count" 这三个 ReaderField
以下是直接对字节进行手工解析的代码
import numpy as np
with open(path, "rb") as fr:
    offset = 0

    x = fr.read(4)  # b'GGUF': 魔术数字
    offset += 4

    x = fr.read(4)   # b'\x03\x00\x00\x00'
    np.frombuffer(x, dtype=np.uint32)  # array([3], dtype=uint32): GGUF 版本号
    offset += 4

    tensor_count = fr.read(8)
    tensor_count = int(np.frombuffer(tensor_count, dtype=np.uint64))  # 339, 表示有 339 个 tensor
    offset += 8

    kv_count = fr.read(8)
    kv_count = int(np.frombuffer(kv_count, dtype=np.uint64)[0])  # 26, 表示后续有 26 个 metadata
    offset += 8
(2) metadata
class GGUFValueType(IntEnum):
    UINT8   = 0
    INT8    = 1
    UINT16  = 2
    INT16   = 3
    UINT32  = 4
    INT32   = 5
    FLOAT32 = 6
    BOOL    = 7
    STRING  = 8
    ARRAY   = 9
    UINT64  = 10
    INT64   = 11
    FLOAT64 = 12

# 一个 ReaderField 代表了一个 metadata 的 kv 对
class ReaderField(NamedTuple):
    offset: int  # 起始地址
    name: str    # key的字符串表示
    parts: list[npt.NDArray[Any]] = []  # 将字节拆分为多个部分, 将 parts 转化为字节合并在一起即为文件中针对该 metadata 的原始的字节表示
    data: list[int] = [-1]  # parts 的下标数组, 真实的数据所对应的实际下标
    types: list[GGUFValueType] = []  # value的数据类型描述, 对于简单的标量, types 仅包含一个元素, 对于嵌套情形, types 包含多个元素

# GGUFReader 中最终是将这些 metadata 放在 self.fields 里
# field: ReaderField
# self.fields[field.name] = field
以下是直接对字节进行手工解析的代码(TODO)
import numpy as np
from gguf.constants import GGUFValueType

with open(path, "rb") as fr:
    fr.seek(24)  # 跳过头部的 24 个字节

    # value 的类型仅支持数字,字符串, Array. 但 Array 里必须是同类型的, 且允许嵌套(嵌套情形后面再看)

    # metadata 的数据组织形式
    # uint64: key 的长度
    # key
    # uint32: value 的类型
    # 以下排布方式与 value 类型相关:
    # (1) string:
    # uint64: value 的长度
    # value
    # 例子: [20, general.architecture, 8, 5, qwen2], GGUFValueType.STRING=8
    # (2) uint8,int8,uint16,int16,uint32,int32,uint64,int64,bool,float32,float64
    # value
    # 例子: [26, qwen2.attention.head_count, 4, 12], GGUFValueType.UINT32=4
    # (3) array
    # uint32: value 中每个元素的类型
    # value: 根据每个元素是字符串还是数值类型确定
    # 例子(array[string]): [21, tokenizer.ggml.tokens, 9, 8, 1, 33, 1, 34, ...]
    # 其中 GGUFValueType.ARRAY=9, GGUFValueType.STRING=8
    # 接下来每两个数据项为一组, 例如: [1, 33] 代表 `!`, [1, 34] 代表 `"`


    # ReaderField: NamedTuple
    # offest: int, 起始地址
    # name: str, key 的字符串形式
    # parts: List[np.array], 以 value 是字符串类型为例, parts 是一个五元组
    #     [
    #         np.array([20], dtype=np.uint64),
    #         np.array([103, 101, 110, 101, 114,  97, 108,  46,  97, 114,  99, 104, 105, 116, 101,  99, 116, 117, 114, 101], dtype=np.uint8),
    #         np.array([8], dtype=np.uint32),
    #         np.array([5], dtype=np.uint64),
    #         np.array([113, 119, 101, 110,  50], dtype=np.uint8)
    #     ]
    # data: List[int], parts 中哪些项是数据, value 是字符串类型为例, data 是 [4], 代表 parts[4] 是 value 的值
    # types: List[GGUFValueType], 以 value 是字符串类型为例, types = [GGUFValueType.STRING]
    # types 与 data 的长度不一定一致, 例如 data=[6,8,...], type = [GGUFValueType.ARRAY, GGUFValueType.STRING]

    key_len = fr.read(8)
    key_len = int(np.frombuffer(key_len, dtype=np.uint64)[0])
    offset += 8

    key_data = fr.read(key_len)
    key_data = np.frombuffer(key_data, dtype=np.uint8)
    offset += key_len

    raw_kv_type = fr.read(4)
    raw_kv_type = int(np.frombuffer(raw_kv_type, dtype=np.uint32)[0])  # 8, 代表 String
metadata 中的 value 可以是 Array, 且允许一定程度的嵌套, 首先利用 GGUFWriter 和 GGUFReader 观察一下可以怎么嵌套
from gguf import GGUFWriter, GGUFReader
import numpy as np

def writer_example() -> None:
    gguf_writer = GGUFWriter("example.gguf", "llama")

    gguf_writer.add_array("arr", [[1, 2, 3], [4, 5, 6]])  # 情况1, ok
    # gguf_writer.add_array("arr", [[1, 2, 3], ["abc", "def"]])  # 情况2, ok, 嵌套时允许不等长, 也允许基本元素类型不一致
    # gguf_writer.add_array("arr", [[1, 2, 3], ["abc", "def", 3]])  # error

    tensor1 = np.ones((32,), dtype=np.float32) * 100.0
    gguf_writer.add_tensor("tensor1", tensor1)
    gguf_writer.write_header_to_file()
    gguf_writer.write_kv_data_to_file()
    gguf_writer.write_tensors_to_file()
    gguf_writer.close()

writer_example()
reader = GGUFReader("example.gguf")

parts = reader.fields['arr'].parts
types = reader.fields["arr"].types
data_indexes = reader.fields["arr"].data
data = [parts[idx] for idx in data_indexes]

print("parts:", parts)
print("types:", types)
print("data_indexes:", data_indexes)
print("data:", data)
情况1
情况1: [[1, 2, 3], [4, 5, 6]]
parts:
[
    memmap([3], dtype=uint64),           # key 字符串 "arr" 的字节数是 3
    memmap([97, 114, 114], dtype=uint8), # key 字符串: "arr" 的 ASCII 码表示是 [97, 114, 114]
    memmap([9], dtype=uint32),           # GGUFValueType.ARRAY=9, 代表 value 的数据类型是 ARRAY, 因此按照 gguf_metadata_value_t 的定义, 接下来需要记录 value 中每个元素的数据类型和 value 的长度, 最后是 value 的实际数据
    memmap([9], dtype=uint32),           # GGUFValueType.ARRAY=9, 由于 value 的数据类型是 ARRAY, 这里需要记录 value 中元素的数据类型, 这里内层依然是 ARRAY
    memmap([2], dtype=uint64),           # 代表 value 的长度是 2
    memmap([5], dtype=uint32),           # GGUFValueType.INT32=5, 由于 value 中元素的数据类型是 ARRAY, 因此需要记录内部数据类型, 长度以及实际内容
    memmap([3], dtype=uint64),           # 长度为 3
    memmap([1], dtype=int32),            # 1, 实际数据
    memmap([2], dtype=int32),            # 2, 实际数据
    memmap([3], dtype=int32),            # 3, 实际数据
    memmap([5], dtype=uint32),           # GGUFValueType.INT32=5, 由于 value 中元素的数据类型是 ARRAY, 因此需要记录内部数据类型, 长度以及实际内容
    memmap([3], dtype=uint64),           # 长度为 3
    memmap([4], dtype=int32),            # 4, 实际数据
    memmap([5], dtype=int32),            # 5, 实际数据
    memmap([6], dtype=int32)             # 6, 实际数据
]
types:
[<GGUFValueType.ARRAY: 9>, <GGUFValueType.ARRAY: 9>, <GGUFValueType.INT32: 5>]
data_indexes:
[7, 8, 9, 12, 13, 14]
data:
[memmap([1], dtype=int32), memmap([2], dtype=int32), memmap([3], dtype=int32), memmap([4], dtype=int32), memmap([5], dtype=int32), memmap([6], dtype=int32)]
备注: types 字段看起来少记录了一个 GGUFValueType.INT32, 这应该是 gguf 的 BUG
情况2
情况2: [[1, 2, 3], ["abc", "def"]]
parts:
[
    memmap([3], dtype=uint64),            # key 字符串 "arr" 的字节数是 3
    memmap([ 97, 114, 114], dtype=uint8), # key 字符串: "arr" 的 ASCII 码表示是 [97, 114, 114]
    memmap([9], dtype=uint32),            # GGUFValueType.ARRAY=9, 代表 value 的数据类型是 ARRAY, 因此按照 gguf_metadata_value_t 的定义, 接下来需要记录 value 中每个元素的数据类型和 value 的长度, 最后是 value 的实际数据
    memmap([9], dtype=uint32),            # GGUFValueType.ARRAY=9, 由于 value 的数据类型是 ARRAY, 这里需要记录 value 中元素的数据类型, 这里内层依然是 ARRAY
    memmap([2], dtype=uint64),            # 2, 代表 value 的长度是 2
    memmap([5], dtype=uint32),            # GGUFValueType.INT32=5, 由于 value 中元素的数据类型是 ARRAY, 因此需要记录内部数据类型, 长度以及实际内容
    memmap([3], dtype=uint64),            # 长度为 3
    memmap([1], dtype=int32),             # 1, 实际数据
    memmap([2], dtype=int32),             # 2, 实际数据
    memmap([3], dtype=int32),             # 3, 实际数据
    memmap([8], dtype=uint32),            # GGUFValueType.STRING=8, 由于 value 中元素的数据类型是 ARRAY, 因此需要记录内部数据类型, 长度以及实际内容
    memmap([2], dtype=uint64),            # 长度为 2
    memmap([3], dtype=uint64),            # 字符串长度是 3
    memmap([97, 98, 99], dtype=uint8),    # 实际数据: "abc"
    memmap([3], dtype=uint64),            # 字符串长度是 3
    memmap([100, 101, 102], dtype=uint8)  # 实际数据: "def"
]
types:
[<GGUFValueType.ARRAY: 9>, <GGUFValueType.ARRAY: 9>, <GGUFValueType.INT32: 5>]
data_indexes:
[7, 8, 9, 13, 15]
data:
[memmap([1], dtype=int32), memmap([2], dtype=int32), memmap([3], dtype=int32), memmap([97, 98, 99], dtype=uint8), memmap([100, 101, 102], dtype=uint8)]
备注: types 字段看起来少记录了一个 GGUFValueType.STRING, 这应该是 gguf 的 BUG
(3) tensor info 以及 padding
TODO
(4) tensor data
TODO
量化与反量化
前面已经提及 huggingface transformers 代码库里的 from_pretrained 方法可以直接读取 GGUF 文件, 这个过程将 GGUF 里的权重反量化为浮点数. 而这个反量化本质上是 gguf 包提供的, 下面先看一个例子验证这一点:
- 使用
from_pretrained方法得到的模型权重 - 直接使用
gguf包提供的GGUFReader和dequantize手动反量化权重
环境要求: gguf == 0.10.0, transformers==4.45.2
from transformers import AutoModelForCausalLM
from gguf import GGUFReader, GGUFWriter, dequantize, quantize
import os

path = "/content/qwen2.5-1.5b-instruct-q5_k_m.gguf"

model = AutoModelForCausalLM.from_pretrained(os.path.dirname(path), gguf_file=path)
model_tensor = model.state_dict()["lm_head.weight"]
print(model_tensor.shape)  # torch.Size([151936, 1536])
print(model_tensor[:2, :3].numpy())
# array([[ 0.00715065,  0.01251364, -0.01072598],
#        [ 0.00555754,  0.0155611 ,  0.02334166]], dtype=float32)


reader = GGUFReader(path)
gguf_tensor = reader.tensors[0]
print(gguf_tensor.name)  # "output.weight"
print(gguf_tensor.tensor_type)   # <GGMLQuantizationType.Q6_K: 14>
print(gguf_tensor.data.shape)  # (151936, 1260), 量化后的数据维度
print(gguf_tensor.shape)  # (151916, 1536) 原始 float 权重的维度

gguf_float_tensor = dequantize(gguf_tensor.data, gguf_tensor.tensor_type)
print(gguf_float_tensor[:2, :3])
# array([[ 0.00715065,  0.01251364, -0.01072598],
#        [ 0.00555754,  0.0155611 ,  0.02334166]], dtype=float32)
可以看到, 上面两种做法得到的浮点数形式的权重是一致的. 因此我们下一步可以深入研究 dequantize 方法, 相关代码是: llama.cpp/gguf-py/gguf/quants.py
我们先看这个例子中用到的 GGMLQuantizationType.Q6_K
gguf.quants.__Quant
gguf.dequantize 方法实际上也就是 gguf.quants.Q6_K.dequantize, 而 Q6_K 继承自 gguf.quants.__Quant.
gguf 采用的量化方法都有如下统一的设定: 假设一个浮点数权重原始是 (out_size, in_size), 而量化后的权重表示是 (out_size, qin_size), 对于 LLM 的输出层来说 out_size 也就是词表长度, in_size 就是最后一个隐藏层的维度.
量化方式总是逐行分组量化的, 也就是将 in_size 进一步按每组 block_size 划分, 也就是:
in_size = block_size * num_blocksqin_size = type_size * num_blocks
也就是 block_size 个 float32 浮点数对应于 type_size 个 uint8 的整数, gguf 中不同的量化方式对应的 block_size 和 type_size 不尽相同, 例如 Q6_K 的 block_size=256, type_size=210.
以实际例子来说, 对于 qwen2.5-1.5b-instruct-q5_k_m.gguf 这份模型的 output.weight 权重来说, 其原始权重的数据类型为 float32, 形状为 (out_size, qin_size)=(151936, 1536), 而量化后的数据类型为 uint8, 形状为 (out_size, qin_size)=(151936, 1260), 也就是
- 量化前第 0 行第 [0, …, 255] 共 256 个 32位浮点数 <—-> 量化后第 0 行第 [0, …, 209] 共 210 个 8位整数
- 量化前第 0 行第 [256, …, 511] 共 256 个 32位浮点数 <—-> 量化后第 0 行第 [210, …, 419] 共 210 个 8位整数
- …
- 量化前第 151935 行第 [0, …, 255] 共 256 个 32位浮点数 <—-> 量化后第 151935 行第 [0, …, 209] 共 210 个 8位整数
- …
__Quant 类及其子类实现了量化与反量化的逻辑, 在具体实现上, 每个子类 (例如: Q6_K) 基本上只需要实现 quantize_blocks 和 dequantize_blocks 两个方法即可
quantize_blocks: 输入是形状为(k, block_size), 数据类型为 float32 的数组, 输出形状为(k, type_size), 数据类型为 uint8 的数组dequantize_blocks: 输入形状为(k, type_size), 数据类型为 uint8 的数组, 输出是形状为(k, block_size), 数据类型为 float32 的数组
以下是对 __Quant 类中反量化的相关代码的个人注释, 源代码位于: https://github.com/ggerganov/llama.cpp/blob/master/gguf-py/gguf/quants.py
个人注释版
可以参照注释前面的标号 (1), (2), … 依次进行追踪阅读
_type_traits = dict[GGMLQuantizationType, type[__Quant]] = {}
QK_K = 256

# (4) 根据量化后的形状计算量化前权重的形状, 在我们的例子中, 输入是 (151936, 1260), 输出是 (151936, 1536)
def quant_shape_from_byte_shape(shape: Sequence[int], quant_type: GGMLQuantizationType) -> tuple[int, ...]:
    # GGML_QUANT_SIZES[GGMLQuantizationType.Q6_K] = (256, 210) = (256, 2+QK_K//2+QK_K//4+QK_K//16)
    # (block_size=256, type_size=210)
    # block_size 与 type_size 的含义是:
    # 量化是按行分组量化的, 也就是说, 量化前是 (151936, 1536) float32, 量化后是 (151936, 1260) uint8
    # 以每行按照 block_size 个元素分组进行量化, 也就是:
    # 量化前第 0 行第 [0, ..., 255] 共 256 个 32位浮点数 <----> 量化后第 0 行第 [0, ..., 209] 共 210 个 8位整数
    # 量化前第 0 行第 [256, ..., 511] 共 256 个 32位浮点数 <----> 量化后第 0 行第 [210, ..., 419] 共 210 个 8位整数
    # ...
    # 量化前第 151935 行第 [0, ..., 255] 共 256 个 32位浮点数 <----> 量化后第 151935 行第 [0, ..., 209] 共 210 个 8位整数
    # ...
    block_size, type_size = GGML_QUANT_SIZES[quant_type]
    if shape[-1] % type_size != 0:
        raise ValueError(f"Quantized tensor bytes per row ({shape[-1]}) is not a multiple of {quant_type.name} type size ({type_size})")
    return (*shape[:-1], shape[-1] // type_size * block_size)

# (5) 这个函数的工作实质上都是通过 func 来完成的
# This is faster than np.vectorize and np.apply_along_axis because it works on more than one row at a time
def _apply_over_grouped_rows(func: Callable[[np.ndarray], np.ndarray], arr: np.ndarray, otype: DTypeLike, oshape: tuple[int, ...]) -> np.ndarray:
    # 入参解释:
    # arr: (151936, 1260) uint8, 量化后的表示
    # func 是一个函数, func 用于对多行进行反量化, 输入是 (n, 210*k=1260) 形状的 uint8 数组, 输出是 (n, 256*k=1536) 形状的 float32 数组. 因此本质上输入输出维数与 _apply_over_grouped_rows 是类似的
    # otype: np.float32
    # oshape: (151936, 1536)
    # 出参解释:
    # (151936, 1536) float32, 反量化后的浮点数表示
    rows = arr.reshape((-1, arr.shape[-1]))  # (m, type_size*k) = (151936, 210*6)
    osize = 1
    for dim in oshape:
        osize *= dim
    out = np.empty(shape=osize, dtype=otype)  # (151936*1536,)
    # compute over groups of 16 rows (arbitrary, but seems good for performance)
    n_groups = (rows.shape[0] // 16) or 1

    # 每个 group 的形状是 (151936/16=9496, 1260)
    # 因此 func(group) 的形状输出是 (9496, 1536)
    # ravel() 函数就只是一个 flatten
    # np.concatenate 之后的输出形状是 (151936*1536,)
    np.concatenate([func(group).ravel() for group in np.array_split(rows, n_groups)], axis=0, out=out)
    # reshape 为输出维度, 也就是 (151936*1536,)
    return out.reshape(oshape)

class __Quant(ABC):
    qtype: GGMLQuantizationType  # 对于 Q6_K 来说, qtype=GGMLQuantizationType.Q6_K
    block_size: int              # 对于 Q6_K 来说, block_size=256
    type_size: int               # 对于 Q6_K 来说, type_size=210

    # 对于 Q6_K 来说, 以下均为默认值
    grid: np.ndarray[Any, np.dtype[np.float32]] | None = None
    grid_shape: tuple[int, int] = (0, 0)
    grid_map: tuple[int | float, ...] = ()
    grid_hex: bytes | None = None

    def __init__(self):
        return TypeError("Quant conversion classes can't have instances")

    def __init_subclass__(cls, qtype: GGMLQuantizationType) -> None:
        cls.qtype = qtype
        cls.block_size, cls.type_size = GGML_QUANT_SIZES[qtype]
        cls.__quantize_lazy = LazyNumpyTensor._wrap_fn(
            cls.__quantize_array,
            meta_noop=(np.uint8, cls.__shape_to_bytes)
        )
        cls.__dequantize_lazy = LazyNumpyTensor._wrap_fn(
            cls.__dequantize_array,
            meta_noop=(np.float32, cls.__shape_from_bytes)
        )
        assert qtype not in _type_traits
        _type_traits[qtype] = cls

    @classmethod
    def init_grid(cls):
        if cls.grid is not None or cls.grid_hex is None:
            return
        # 此处省略后面的逻辑: ...

    @classmethod
    @abstractmethod
    def dequantize_blocks(cls, blocks: np.ndarray) -> np.ndarray:
        raise NotImplementedError

    @classmethod
    def __shape_from_bytes(cls, shape: Sequence[int]):
        return quant_shape_from_byte_shape(shape, cls.qtype)

    # (6) 反量化多行的逻辑
    # dequantize_rows 的输入是 (n=9496, 210*k=1260) 形状的 uint8 数组, 输出是 (n=9496, 256*k=1536) 形状的 float32 数组
    @classmethod
    def dequantize_rows(cls, rows: np.ndarray) -> np.ndarray:
        rows = rows.view(np.uint8)  # 这里什么也没干
        shape = rows.shape
        n_blocks = rows.size // cls.type_size
        blocks = rows.reshape((n_blocks, cls.type_size))  # (9496*6, 210)
        # 对 blocks 进行反量化, 输入形状是 (n*k, type_size), 输出形状是 (n*k, block_size)
        # 也就是子类只需要重载这个 dequantize_blocks 函数即可
        blocks = cls.dequantize_blocks(blocks)  # (9496*6, 256)
        assert blocks.dtype == np.float32
        assert blocks.shape[-1] == cls.block_size
        return blocks.reshape(cls.__shape_from_bytes(shape))  # (n*k, block_size) -> (n, block_size*k)

    # (3) dequantize 的调用实际发生在此处
    @classmethod
    def __dequantize_array(cls, array: np.ndarray) -> np.ndarray:
        cls.init_grid()  # 对于 Q6_K 来说, 这里没有执行任何逻辑, 但其他的量化方式, 可能会有逻辑
        return _apply_over_grouped_rows(
            cls.dequantize_rows,
            arr=array,  # (151936, 1260), uint8
            otype=np.float32,
            oshape=cls.__shape_from_bytes(array.shape)  # (151936, 1536)
        )

    # (2) 我们暂时不考虑 LazyNumpyTensor 的逻辑, 因此实际上只是调用 __dequantize_array
    @classmethod
    def dequantize(cls, tensor: np.ndarray | LazyNumpyTensor) -> np.ndarray:
        if isinstance(tensor, LazyNumpyTensor):
            return cls.__dequantize_lazy(tensor)
        else:
            return cls.__dequantize_array(tensor)

class Q6_K(__Quant, qtype=GGMLQuantizationType.Q6_K):
    # 疑惑: Q6_K 在 gguf==0.10.0 版本没有 quantize_blocks
    # (7) 对多个 block (或者说是 group) 进行反量化
    # 输入是: (x=9496*6, type_size=210) uint8
    # 输出是: (x=9496*6, block_size=256) float32
    # 以下注释只先注释形状变化
    @classmethod
    def dequantize_blocks(cls, blocks: np.ndarray) -> np.ndarray:
        n_blocks = blocks.shape[0]

        # np.hsplit 的作用是按列进行划分
        # np.hsplit(arr, [2, 5, 10])  # 输出: arr[:, :2], arr[:, 2:5], arr[:, 5:10], arr[:, 10:]
        ql, rest = np.hsplit(blocks, [QK_K // 2])  # ql: (x, 128), rest: (x, 210-128=82)
        qh, rest = np.hsplit(rest, [QK_K // 4])    # qh: (x, 82), rest: (x, 82-64=18)
        scales, d = np.hsplit(rest, [QK_K // 16])  # scales: (x, 16), d: (x, 2)

        # view 不改变数据, 只是改变解释方式, astype 是逐元素进行数据类型转化
        # scales: (x, 16): uint8 -> (x, 16): float32, 注意是 astype(np.float32), 而不是 view(np.float32)
        scales = scales.view(np.int8).astype(np.float32)
        # d: (x, 2): uint8 -> (x, 1): float16->float32, 注意是 view(np.float16)
        d = d.view(np.float16).astype(np.float32)

        # 以下为实际的反量化过程的核心逻辑, 具体解释见后文
        # d: (x, 16, 1)
        d = (d * scales).reshape((n_blocks, QK_K // 16, 1))

        # (x, 2, 1, 64), (1, 1, 2, 1) -> (x, 2, 2, 64)
        ql = ql.reshape((n_blocks, -1, 1, 64)) >> np.array([0, 4], dtype=np.uint8).reshape((1, 1, 2, 1))
        # # (x, 8, 32)
        ql = (ql & np.uint8(0x0F)).reshape((n_blocks, -1, 32))

        # (x, 2, 1, 32), (1, 1, 4, 1) -> (x, 2, 4, 32)
        qh = qh.reshape((n_blocks, -1, 1, 32)) >> np.array([0, 2, 4, 6], dtype=np.uint8).reshape((1, 1, 4, 1))
        # (x, 8, 32)
        qh = (qh & np.uint8(0x03)).reshape((n_blocks, -1, 32))

        # (x, 8, 32)
        q = (ql | (qh << np.uint8(4))).astype(np.int8) - np.int8(32)
        # (x, 16, 16)
        q = q.reshape((n_blocks, QK_K // 16, -1)).astype(np.float32)

        # (x, 16, 1), (x, 16, 16) -> (x, 16, 16) -> (x, 256)
        return (d * q).reshape((n_blocks, QK_K))

# (1) 对外接口, 起始本质上就是 Q6_K.dequantize
# 在 Q6_K 的情形下, qwen2.5-1.5b, data=output.weight (float32) 的形状是 (151936, 1536)
# 其中 151936 是词表长度, 1536 是隐层的维数
# 而将其量化后的表示是 (151936, 1260), uint8
def dequantize(data: np.ndarray, qtype: GGMLQuantizationType) -> np.ndarray:
    # data: (151936, 1260), uint8
    if qtype == GGMLQuantizationType.F32:
        return data.view(np.float32)
    elif qtype == GGMLQuantizationType.F16:
        return data.view(np.float16).astype(np.float32)
    elif (q := _type_traits.get(qtype)) is not None:
        return q.dequantize(data)
    else:
        raise NotImplementedError(f"Dequantization for {qtype.name} is not yet implemented")
gguf.quants.Q6_K
https://huggingface.co/docs/hub/en/gguf 中对这种量化类型的描述
6-bit quantization (q). Super-blocks with 16 blocks, each block has 16 weights. Weight formula: w = q * block_scale(8-bit), resulting in 6.5625 bits-per-weight.
以下为 gguf.quants.Q6_K 在 gguf==0.10.0 版本里的全部源代码.
备注: gguf==0.10.0 版本的 Q6_K 类没有 quantize_blocks 方法, 但实际上应该可以参考 C 语言的实现 https://github.com/ggerganov/llama.cpp/blob/master/ggml/src/ggml-quants.c
QK_K = 256

class Q6_K(__Quant, qtype=GGMLQuantizationType.Q6_K):
    # 输入例子是: (x=9496*6, type_size=210) uint8
    # 输出例子是: (x=9496*6, block_size=256) float32
    # 以下注释只先注释形状变化
    @classmethod
    def dequantize_blocks(cls, blocks: np.ndarray) -> np.ndarray:
        n_blocks = blocks.shape[0]

        # np.hsplit 的作用是按列进行划分
        # np.hsplit(arr, [2, 5, 10])  # 输出: arr[:, :2], arr[:, 2:5], arr[:, 5:10], arr[:, 10:]
        ql, rest = np.hsplit(blocks, [QK_K // 2])  # ql: (x, 128), rest: (x, 210-128=82)
        qh, rest = np.hsplit(rest, [QK_K // 4])    # qh: (x, 64), rest: (x, 82-64=18)
        scales, d = np.hsplit(rest, [QK_K // 16])  # scales: (x, 16), d: (x, 2)

        # view 不改变数据, 只是改变解释方式, astype 是逐元素进行数据类型转化
        # scales: (x, 16): uint8 -> (x, 16): float32, 注意是 astype(np.float32), 而不是 view(np.float32)
        scales = scales.view(np.int8).astype(np.float32)
        # d: (x, 2): uint8 -> (x, 1): float16->float32, 注意是 view(np.float16)
        d = d.view(np.float16).astype(np.float32)

        # 以下为实际的反量化过程的核心逻辑
        # d: (x, 16, 1)
        d = (d * scales).reshape((n_blocks, QK_K // 16, 1))

        # (x, 2, 1, 64), (1, 1, 2, 1) -> (x, 2, 2, 64)
        ql = ql.reshape((n_blocks, -1, 1, 64)) >> np.array([0, 4], dtype=np.uint8).reshape((1, 1, 2, 1))
        # # (x, 8, 32)
        ql = (ql & np.uint8(0x0F)).reshape((n_blocks, -1, 32))

        # (x, 2, 1, 32), (1, 1, 4, 1) -> (x, 2, 4, 32)
        qh = qh.reshape((n_blocks, -1, 1, 32)) >> np.array([0, 2, 4, 6], dtype=np.uint8).reshape((1, 1, 4, 1))
        # (x, 8, 32)
        qh = (qh & np.uint8(0x03)).reshape((n_blocks, -1, 32))

        # (x, 8, 32)
        q = (ql | (qh << np.uint8(4))).astype(np.int8) - np.int8(32)
        # (x, 16, 16)
        q = q.reshape((n_blocks, QK_K // 16, -1)).astype(np.float32)

        # (x, 16, 1), (x, 16, 16) -> (x, 16, 16) -> (x, 256)
        return (d * q).reshape((n_blocks, QK_K))
接下来仔细看一下具体过程, 我们知道入参 blocks 的第一个维度是相互独立的, 因此我们认为 blocks 的形状是 (1, 210),
分块: 前几个步骤是将这 210 个 uint8 数字分为 4 块, 我们记作:
ql = [a0, a1, ..., a127]     # 128
qh = [b0, b1, ..., b63]      # 64
scales = [c0, c1, ..., c15]  # 16
d = [d0, d1]                 # 2, 重新解释为一个 float16
先看 ql 的后续操作:
step 1: ql = ql.reshape((n_blocks, -1, 1, 64)) >> np.array([0, 4], dtype=np.uint8).reshape((1, 1, 2, 1))
ql = [
    [
        [a0>>0, a1>>0, ..., a63>>0],
        [a0>>4, a1>>4, ..., a63>>4]
    ],
    [
        [a64>>0, a65>>0, ..., a127>>0],
        [a64>>4, a65>>4, ..., a127>>4]
    ]
]  # 形状: (x, 2, 2, 64)
step 2: ql = (ql & np.uint8(0x0F)).reshape((n_blocks, -1, 32))
我们用 a0_l 和 a0_h 代表 a0 的比特表示的 4 个低比特位和 4 个高比特位
ql = [
    [a0_l,  a1_l, ...,  a31_l],
    [a32_l, a33_l, ..., a63_l],
    [a0_h,  a1_h, ...,  a31_h],
    [a32_h, a33_h, ..., a63_h],
    [a64_l, a65_l, ..., a95_l],
    [a96_l, a97_l, ..., a127_l],
    [a64_h, a65_h, ..., a95_h],
    [a96_h, a97_h, ..., a127_h],
]  # 形状: (x, 8, 32)
qh 的后续操作: 同理, qh=[b0, ..., b64], 我们将每个数字的最低,次低,次高,最高的 2 比特位记作 b0_0, b0_1, b0_2, b0_3, 最终 qh 被转化为:
qh = [
    [b0_0, b1_0, ..., b31_0],
    [b0_1, b1_1, ..., b31_1],
    [b0_2, b1_2, ..., b31_2],
    [b0_3, b1_3, ..., b31_3],
    [b32_0, b33_0, ..., b63_0],
    [b32_1, b33_1, ..., b63_1],
    [b32_2, b33_2, ..., b63_2],
    [b32_3, b33_3, ..., b63_3],
]  # 形状: (x, 8, 32)
再看 q 的这两步: 将 ql 和 qh 组装为 6 bit 数
# (x, 8, 32), 也就是将 ql 和 qh 组装为 6 bit 数字, 然后减去 2^5=32
q = (ql | (qh << np.uint8(4))).astype(np.int8) - np.int8(32)
# reshape 为了 (x, 16, 16)
q = q.reshape((n_blocks, QK_K // 16, -1)).astype(np.float32)
放缩系数: 每 16 个为一组, 每个组内共享 1 个放缩系数, 而全部的 16 个组的放缩系数共享一个 base, 每个组的放缩系数都是这个 base 的整数倍
# scales: (x, 16), d: (x,)
d = d.view(np.float16).astype(np.float32)
d = (d * scales).reshape((n_blocks, QK_K // 16, 1))

# (x, 16, 1), (x, 16, 16) -> (x, 16, 16) -> (x, 256)
return (d * q).reshape((n_blocks, QK_K))
总结: 反量化的计算结果为:
d * [
    c0 * ([(b0_0<<4)+a0_l, (b1_0<<4)+a1_l, ..., (b15_0<<4)+a15_l] - 32),
    c1 * ([(b16_0<<4)+a16_l, (b17_0<<4)+a17_l, ..., (b31_0<<4)+a31_l] - 32),
    c2 * ([(b0_1<<4)+a32_l, (b1_1<<4)+a33_l, ..., (b15_1<<4)+a47_l] - 32),
    c3 * ([(b16_1<<4)+a48_l, (b17_1<<4)+a49_l, ..., (b31_1<<4)+a63_l] - 32),

    c4 * ([(b0_2<<4)+a0_h, (b1_2<<4)+a1_h, ..., (b15_2<<4)+a15_h] - 32),
    c5 * ([(b16_2<<4)+a16_h, (b17_2<<4)+a17_h, ..., (b31_2<<4)+a31_h] - 32),
    c6 * ([(b0_3<<4)+a32_h, (b1_3<<4)+a33_h, ..., (b15_3<<4)+a47_h] - 32),
    c7 * ([(b16_3<<4)+a48_h, (b17_3<<4)+a49_h, ..., (b31_3<<4)+a63_h] - 32),

    c8 * ([(b32_0<<4)+a64_l, (b33_0<<4)+a65_l, ..., (b47_0<<4)+a79_l] - 32),
    c9 * ([(b48_0<<4)+a80_l, (b49_0<<4)+a81_l, ..., (b63_0<<4)+a95_l] - 32),
    c10 * ([(b32_1<<4)+a96_l, (b33_1<<4)+a97_l, ..., (b47_1<<4)+a111_l] - 32),
    c11 * ([(b48_1<<4)+a112_l, (b49_1<<4)+a113_l, ..., (b63_1<<4)+a127_l] - 32),

    c12 * ([(b32_2<<4)+a64_h, (b33_2<<4)+a65_h, ..., (b47_2<<4)+a79_h] - 32),
    c13 * ([(b48_2<<4)+a80_h, (b49_2<<4)+a81_h, ..., (b63_2<<4)+a95_h] - 32),
    c14 * ([(b32_3<<4)+a96_h, (b33_3<<4)+a97_h, ..., (b47_3<<4)+a111_h] - 32),
    c15 * ([(b48_3<<4)+a112_h, (b49_3<<4)+a113_h, ..., (b63_3<<4)+a127_h] - 32),
].flatten()

# 反量化组合方式:
# [
#     a0_l, ..., a63_l,
#     a0_h, ..., a63_h,
#     a64_l, ..., a127_l,
#     a64_h, ..., a127_h
# ] + ([
#     b0_0, ..., b31_0,
#     b0_1, ..., b31_1,
#     b0_2, ..., b31_2,
#     b0_3, ..., b31_3,
#     b32_0, ..., b63_0,
#     b32_1, ..., b63_1,
#     b32_2, ..., b63_2,
#     b32_3, ..., b63_3,
# ] << 4) - 32
具体实现以及验证
import numpy as np

blocks = np.random.randint(0, 256, (210,)).astype(np.int8)

def get_4bit(x):
    low = x & np.uint8(0b00001111)
    high = (x & np.uint8(0b11110000)) >> 4
    return low, high

def get_2bit(x):
    x0 = x & np.uint8(0b00000011)
    x1 = (x & np.uint8(0b00001100)) >> 2
    x2 = (x & np.uint8(0b00110000)) >> 4
    x3 = (x & np.uint8(0b11000000)) >> 6
    return x0, x1, x2, x3

def my_dequant(blocks):
    # blocks: np.array, uint8, (210,)
    d = blocks[-2:].view(np.float16).astype(np.float32)

    a = blocks[:128]
    b = blocks[128:192]
    c = blocks[192:208].astype(np.int8).astype(np.float32)

    a_low, a_high = get_4bit(a)
    b_0, b_1, b_2, b_3 = get_2bit(b)

    a_low = a_low.view(np.int8)
    a_high = a_high.view(np.int8)

    b_0 = b_0.view(np.int8)
    b_1 = b_1.view(np.int8)
    b_2 = b_2.view(np.int8)
    b_3 = b_3.view(np.int8)

    # print(d)
    # print(c)
    # print(a_low, a_high)
    # print(b_0, b_1, b_2, b_3)

    a0_16_low = a_low[:16]
    a16_32_low = a_low[16:32]
    a32_48_low = a_low[32:48]
    a48_64_low = a_low[48:64]
    a64_80_low = a_low[64:80]
    a80_96_low = a_low[80:96]
    a96_112_low = a_low[96:112]
    a112_128_low = a_low[112:128]

    a0_16_high = a_high[:16]
    a16_32_high = a_high[16:32]
    a32_48_high = a_high[32:48]
    a48_64_high = a_high[48:64]
    a64_80_high = a_high[64:80]
    a80_96_high = a_high[80:96]
    a96_112_high = a_high[96:112]
    a112_128_high = a_high[112:128]

    b0_16_0 = b_0[:16]
    b16_32_0 = b_0[16:32]
    b32_48_0 = b_0[32:48]
    b48_64_0 = b_0[48:64]

    b0_16_1 = b_1[:16]
    b16_32_1 = b_1[16:32]
    b32_48_1 = b_1[32:48]
    b48_64_1 = b_1[48:64]

    b0_16_2 = b_2[:16]
    b16_32_2 = b_2[16:32]
    b32_48_2 = b_2[32:48]
    b48_64_2 = b_2[48:64]

    b0_16_3 = b_3[:16]
    b16_32_3 = b_3[16:32]
    b32_48_3 = b_3[32:48]
    b48_64_3 = b_3[48:64]

    result = np.array([
        c[0] * ((b0_16_0<<4)+a0_16_low-32).view(np.int8),
        c[1] * ((b16_32_0<<4)+a16_32_low-32).view(np.int8),
        c[2] * ((b0_16_1<<4)+a32_48_low-32).view(np.int8),
        c[3] * ((b16_32_1<<4)+a48_64_low-32).view(np.int8),

        c[4] * ((b0_16_2<<4)+a0_16_high-32).view(np.int8),
        c[5] * ((b16_32_2<<4)+a16_32_high-32).view(np.int8),
        c[6] * ((b0_16_3<<4)+a32_48_high-32).view(np.int8),
        c[7] * ((b16_32_3<<4)+a48_64_high-32).view(np.int8),

        c[8] * ((b32_48_0<<4)+a64_80_low-32).view(np.int8),
        c[9] * ((b48_64_0<<4)+a80_96_low-32).view(np.int8),
        c[10] * ((b32_48_1<<4)+a96_112_low-32).view(np.int8),
        c[11] * ((b48_64_1<<4)+a112_128_low-32).view(np.int8),

        c[12] * ((b32_48_2<<4)+a64_80_high-32).view(np.int8),
        c[13] * ((b48_64_2<<4)+a80_96_high-32).view(np.int8),
        c[14] * ((b32_48_3<<4)+a96_112_high-32).view(np.int8),
        c[15] * ((b48_64_3<<4)+a112_128_high-32).view(np.int8),
    ]) * d

    return result

# 验证
from gguf import GGUFReader, GGUFWriter, dequantize, quantize
path = "/content/qwen2.5-1.5b-instruct-q5_k_m.gguf"

reader = GGUFReader(path)
gguf_tensor = reader.tensors[0]
print(gguf_tensor.tensor_type)   # <GGMLQuantizationType.Q6_K: 14>

single_int8_block = gguf_tensor.data[:1, :210]  # (1, 210)
official_single_float32_block = dequantize(single_int8_block, gguf_tensor.tensor_type)[0]  # (256,)
my_single_float32_block = my_dequant(single_int8_block.reshape(-1))
np.max(np.abs(official_single_float32_block - my_single_float32_block))  # 0.0
Q6_K 的 C 实现
TODO: 本节的最终目的是为了为 llama.cpp 的 gguf-py 的 Q6_K 提关于 quantize 方法的 PR, 为此分解出几个任务:
任务 1: 怎么对 llama.cpp 的 C 代码做调试 (编译, 添加测试用例)
任务 2: 验证 gguf-py 与 llama.cpp 里 C 代码 Q6_K 的 dequantize 结果 (可以参考 gguf-py/tests/test_quants.py)
任务 3: 理解 Q6_K 的 quantize 的 C 实现, 并迁移为 python 实现
任务 4: PR
任务 1 (已跑通): 测试 ggml/src/ggml-quants.c 中的 make_qx_quants 函数 (以下方案为临时方案)
增加一个 examples/learn 目录, 并写入 learn.cpp 和 CMakeLists.txt
examples/learn/CMakeLists.txt
set(TARGET learn)
add_executable(${TARGET} learn.cpp)
install(TARGETS ${TARGET} RUNTIME)
target_link_libraries(${TARGET} PRIVATE ggml)
target_include_directories(${TARGET} PUBLIC ../../ggml/src)
target_compile_features(${TARGET} PRIVATE cxx_std_11)
examples/learn/learn.cpp
#include "ggml.h"
#include "ggml-quants.h"

int main() {
    struct ggml_tensor * tensor = NULL;
    float (*func_point)(int, int, const float *, int8_t *, int, const float *) = make_qx_quants;

    printf("Result: \n");
    return 0;
}
examples/CMakeLists.txt 里增加
add_subdirectory(learn)
修改 ggml/src/ggml-quants.c 里 make_qx_quants 函数的 static 前缀
在 ggml/src/ggml-quants.h 里增加一行:
float make_qx_quants(int n, int nmax, const float * x, int8_t * L, int rmse_type, const float * qw);
然后执行 cmake 的 configure 和 build, 并测试运行 learn.cpp
mkdir build && cd build && cmake ../ && cmake --build . && ./bin/learn
任务 2:
在 ggml/src/ggml-quants.h 中, 有如下关于 q6_K 的声明
void quantize_row_q6_K_ref(const float * GGML_RESTRICT x, block_q6_K * GGML_RESTRICT y, int64_t k);

void quantize_row_q6_K(const float * GGML_RESTRICT x, void * GGML_RESTRICT y, int64_t k);

void dequantize_row_q6_K(const block_q6_K * GGML_RESTRICT x, float * GGML_RESTRICT y, int64_t k);

size_t quantize_q6_K(const float * GGML_RESTRICT src, void * GGML_RESTRICT dst, int64_t nrows, int64_t n_per_row, const float * imatrix);
而在 ggml/src/ggml-quants.c 中, 除上面以外, 还包含:
static void quantize_row_q6_K_impl(const float * restrict x, block_q6_K * restrict y, int64_t n_per_row, const float * quant_weights);
quantize 相关的 4 个函数调用关系如下:
quantize_q6_K条件调用quantize_row_q6_K_ref或quantize_row_q6_K_implquantize_row_q6_K调用quantize_row_q6_K_refquantize_row_q6_K_ref不调用其他quantize_row_q6_K_impl不调用其他
从函数入参来看 quantize_q6_K 和 quantize_row_q6_K 的参数是基本类型的指针, 而 quantize_row_q6_K_ref 和 quantize_row_q6_K_impl 包含了自定义数据结构 block_q6_K
任务 4
原始的 PR, 对齐的验证方法如下(TODO:有些不优雅: make libglmm.so):
cd /path/to/llama.cpp
make libglmm.so
cd gguf-py
python tests/test_quants.py --libggml ../libggml.so
量化推理
TODO