(Ready) QWen-VL 浅析
动机、参考资料、涉及内容
- Qwen-VL 的模型结构及推理流程(主要是 huggingface hub 源码阅读): https://huggingface.co/Qwen/Qwen-VL-Chat
- Qwen-VL 训练与微调(主要是论文及 GitHub 源码阅读): 论文: https://arxiv.org/abs/2308.12966, GitHub: https://github.com/QwenLM/Qwen-VL
(P0) 使用
直接摘抄自 Qwen-VL huggingface hub 的 README
from transformers import AutoModelForCausalLM, AutoTokenizer
from transformers.generation import GenerationConfig
import torch
torch.manual_seed(1234)

tokenizer = AutoTokenizer.from_pretrained("Qwen/Qwen-VL-Chat", trust_remote_code=True)
model: "QWenLMHeadModel" = AutoModelForCausalLM.from_pretrained(
    "Qwen/Qwen-VL-Chat-int4",
    device_map="auto",
    trust_remote_code=True,
    fp16=True,
    offload_folder="./offload"
).eval()

# 1st dialogue turn
query: str = tokenizer.from_list_format([
    {'image': 'https://qianwen-res.oss-cn-beijing.aliyuncs.com/Qwen-VL/assets/demo.jpeg'},
    {'text': '这是什么'},
])
# query = 'Picture 1: <img>https://qianwen-res.oss-cn-beijing.aliyuncs.com/Qwen-VL/assets/demo.jpeg</img>\n这是什么'
response, history = model.chat(tokenizer, query=query, history=None)
print(response)  # 图中是一名年轻女子在沙滩上和她的狗玩耍,狗的品种可能是拉布拉多。她们坐在沙滩上,狗的前腿抬起来,似乎在和人类击掌。两人之间充满了信任和爱。
print(history)
# history:
# [
#     (
#         'Picture 1: <img>https://qianwen-res.oss-cn-beijing.aliyuncs.com/Qwen-VL/assets/demo.jpeg</img>\n这是什么',
#         '图中是一名年轻女子在沙滩上和她的狗玩耍,狗的品种可能是拉布拉多。她们坐在沙滩上,狗的前腿抬起来,似乎在和人类击掌。两人之间充满了信任和爱。'
#     ),
# ]

# 2nd dialogue turn
response, history = model.chat(tokenizer, '输出"击掌"的检测框', history=history)
print(response)  # <ref>击掌</ref><box>(517,508),(589,611)</box>
# 这里: (x1, y1), (x2, y2) = (517/1000*w, 508/1000*h), (589/1000*w, 611/1000*h)
# 坐标原点位于图像左上角, 水平方向为 x 轴, 竖直方向为 y 轴
# (x1, y1) 是左上角, (x2, y2) 是右下角, x1 表示图片左侧到矩形左边的距离, y1 表示图片上侧到矩形上边的距离

print(history)
# history
# [
#     (
#         'Picture 1: <img>https://qianwen-res.oss-cn-beijing.aliyuncs.com/Qwen-VL/assets/demo.jpeg</img>\n这是什么',
#         '图中是一名年轻女子在沙滩上和她的狗玩耍,狗的品种可能是拉布拉多。她们坐在沙滩上,狗的前腿抬起来,似乎在和人类击掌。两人之间充满了信任和爱。'
#     ),
#     (
#         '输出"击掌"的检测框',
#         '<ref>击掌</ref><box>(517,508),(589,611)</box>'
#     ),
# ]

image = tokenizer.draw_bbox_on_latest_picture(response, history)
if image:
  image.save('1.jpg')
else:
  print("no box")
关于坐标的进一步说明 (QWen-VL 的原始实现不是用 opencv 的, 经核验与下面的做法等价):
import cv2
image = cv2.imread("demo.jpeg")
h, w = image.shape[:2]  # 1365, 2048
x1, y1, x2, y2 = 536, 509, 588, 602
x1, y1, x2, y2 = int(x1 / 1000 * w), int(y1 / 1000 * h), int(x2 / 1000 * w), int(y2 / 1000 * h)
image = cv2.rectangle(image, (x1, y1), (x2, y2), (0, 0, 255))
cv2.imwrite("box.jpeg", image)
下文的源码解析将围绕上面这个使用例子展开
TL;DR
QWen-VL/QWen-1.8B/QWen-7B/QWen-14B/QWen-72B 均采用了这些配置: 位置编码使用 RoPE 编码, 外推方案使用 dynamic NTK, attention 使用普通的 scaled dot product self-attention, MLP 层使用的不是普通的双层线性结构(具体结构参见下文 QWenMLP).
QWen-VL 的输入可以是图像和文字, 但输出只能是文字.
QWen-VL 图像编码的逻辑是将每张图片替换为 256 个向量, 然后当作普通 token 的 Embedding 进行 QWen 的 transformer 部分. 图像编码的部分首先采用 ViT 结构, 1024 个 embedding 向量, 然后利用 256 个可学习的 query, 使用普通的 attention 层最终转为 256 个 embedding 向量.
QWen-VL 的训练过程参考下文.
QWen-VL-Max 是目前 QWen-VL 系列最强的模型, 但不开源, QWen-VL-Plus 也不开源, 具体细节均无从得知.
tokenizer
(Alpha) QWenTokenizer.__init__: 特殊 token
源码
PAT_STR = r"""(?i:'s|'t|'re|'ve|'m|'ll|'d)|[^\r\n\p{L}\p{N}]?\p{L}+|\p{N}| ?[^\s\p{L}\p{N}]+[\r\n]*|\s*[\r\n]+|\s+(?!\S)|\s+"""
ENDOFTEXT = "<|endoftext|>"
IMSTART = "<|im_start|>"
IMEND = "<|im_end|>"
EXTRAS = tuple((f"<|extra_{i}|>" for i in range(205)))
SPECIAL_TOKENS = (
    ENDOFTEXT,
    IMSTART,
    IMEND,
) + EXTRAS

class QWenTokenizer(PreTrainedTokenizer):
    def __init__(
        ...,
        image_start_tag='<img>',
        image_end_tag='</img>',
        image_pad_tag='<imgpad>',
        ref_start_tag='<ref>',
        ref_end_tag='</ref>',
        box_start_tag='<box>',
        box_end_tag='</box>',
        quad_start_tag='<quad>',
        quad_end_tag='</quad>',
    ):
    # 这一部分将用于后续的 tokenize 部分作为 allowed_special
    # IMAGE_ST: image special tokens
    self.IMAGE_ST = (
        ref_start_tag, ref_end_tag,
        box_start_tag, box_end_tag,
        quad_start_tag, quad_end_tag,
        image_start_tag, image_end_tag,
        image_pad_tag
    )
    self.mergeable_ranks = _load_tiktoken_bpe(vocab_file)  # type: dict[bytes, int]
    self.special_tokens = {
        token: index
        for index, token in enumerate(
            SPECIAL_TOKENS + self.IMAGE_ST, start=len(self.mergeable_ranks)
        )
    }
    self.tokenizer = tiktoken.Encoding(
        "Qwen",
        pat_str=PAT_STR,
        mergeable_ranks=self.mergeable_ranks,
        special_tokens=self.special_tokens,
    )
说明
从源码中可以看出, Qwen-VL 的 tokenizer 采用的是 tiktoken, 其中普通字符一共 151643 个 (也就是 qwen.tiktoken 文件的行数), 特殊字符一共 217 (3+205+9) 个, 而这些特殊 token 的作用是:
TODO: 以下描述可能还是用流程图更清晰
<|im_start|>和<|im_end|>, 一轮(简单理解成一个角色说一次话)的边界, 详见下文关于 chatml 的说明<|endoftext|>是模型生成的结束 token<img>,</img>用于包裹一个“图像”, 在输入模型之前, 每张图片会被替换为 256 个图像特征, 以及首尾的<img>和</img>作为 token 的 embedding<imgpad>, 仅用于临时状态, 暂时作为每个图像的 256 个位置的填充, 在模型输入前会被替换掉<ref>,</ref>,<box>,</box>,<quad>,</quad>: 用于描述物体框, 其中 box 是矩形框, 而 quad 是四边形框, 有几种情况:<box>(20,30),(40,50)</box><ref>香蕉</ref><box>(20,30),(40,50)</box><ref>香蕉</ref><quad>(568,121),(625,131),(624,182),(567,172)</quad>
(Ready) QWenTokenizer.from_list_format
源码
class QWenTokenizer(PreTrainedTokenizer):
    def from_list_format(self, list_format: List[Dict]) -> str:
        text = ''
        num_images = 0
        for ele in list_format:
            if 'image' in ele:
                num_images += 1
                text += f'Picture {num_images}: '
                text += self.image_start_tag + ele['image'] + self.image_end_tag
                text += '\n'
            elif 'text' in ele:
                text += ele['text']
            elif 'box' in ele:
                if 'ref' in ele:
                    text += self.ref_start_tag + ele['ref'] + self.ref_end_tag
                for box in ele['box']:
                    text += self.box_start_tag + '(%d,%d),(%d,%d)' % (box[0], box[1], box[2], box[3]) + self.box_end_tag
            else:
                raise ValueError("Unsupport element: " + str(ele))
        return text
说明
可以看出 list_format 是一个列表, 每一项都是字典类型, 但其实只有这几种情况是有效的
item_1 = {"image": "https://qianwen-res.oss-cn-beijing.aliyuncs.com/Qwen-VL/assets/demo.jpeg"}
item_2 = {"text": "hello world"}
# 注意 box 是相对坐标, 也就是 (10/1000*w, 20/1000*h, 30/1000*w, 200/1000*h)
item_3 = {"box": [10, 100, 30, 200]}  # (x1, y1), (x2, y2) = (10, 100), (30, 200) 表示一个竖直方向较长, 水平方向较短的矩形
item_4 = {"box": [10, 100, 30, 200], "ref": "香蕉"}

# 对应的 string 如下
item_1_str = "Picture {i}: <img>https://qianwen-res.oss-cn-beijing.aliyuncs.com/Qwen-VL/assets/demo.jpeg</img>\n"
item_2_str = "hello world"
item_3_str = "<box>(10, 100),(30,200)</box>"
item_4_str = "<ref>香蕉</ref><box>(10, 100),(30,200)</box>"

# 注意: query 是代表一次询问, 也就是说一次询问里可以包含多段文本, 多张图片
query = tokenizer.from_list_format(
    [item_1, item_2, item_3, item_4]
)
# query = "".join([item_1_str, item_2_str, item_3_str, item_4_str])
(Ready) QWenLMHeadModel.chat
# class QWenPreTrainedModel(transformers.model_utils.PreTrainedModel)
class QWenLMHeadModel(QWenPreTrainedModel):
    def chat(
        self,
        tokenizer: PreTrainedTokenizer,
        query: str,
        history: Optional[HistoryType],
        system: str = "You are a helpful assistant.",  # 注意: 这里有个默认的 system prompt
        append_history: bool = True,
        stream: Optional[bool] = _SENTINEL,
        stop_words_ids: Optional[List[List[int]]] = None,
        generation_config: Optional[GenerationConfig] = None,
        **kwargs,
    ) -> Tuple[str, HistoryType]:
        generation_config = generation_config if generation_config is not None else self.generation_config

        # stream 参数不起作用, 如果需要启用流式, 则需要使用 QWenLMHeadModel.chat_stream
        assert stream is _SENTINEL, _ERROR_STREAM_IN_CHAT
        # Qwen 目前只支持 chat_format=="chatml"
        assert generation_config.chat_format == 'chatml', _ERROR_BAD_CHAT_FORMAT
        if history is None:
            history = []
        # stop_words_ids 是 generate 时的停止生成序列
        if stop_words_ids is None:
            stop_words_ids = []

        max_window_size = kwargs.get('max_window_size', None)
        if max_window_size is None:
            max_window_size = generation_config.max_window_size

        # make_context 函数是本节继续深入的部分
        raw_text, context_tokens = make_context(
            tokenizer,
            query,
            history=history,
            system=system,
            max_window_size=max_window_size,
            chat_format=generation_config.chat_format,
        )

        # 追加了一些默认的 stop_words_ids:
        # [[tokenizer.im_end_id], [tokenizer.im_start_id]]
        # 也就是 '<|im_end|>', '<|im_start|>' 对应的 token id
        stop_words_ids.extend(get_stop_words_ids(
            generation_config.chat_format, tokenizer
        ))

        input_ids = torch.tensor([context_tokens]).to(self.device)

        # ============== 模型推理流程 ==========
        outputs = self.generate(
                    input_ids,
                    stop_words_ids=stop_words_ids,
                    return_dict_in_generate=False,
                    generation_config=generation_config,
                    **kwargs,
                )
        # =====================================

        response = decode_tokens(
            outputs[0],
            tokenizer,
            raw_text_len=len(raw_text),
            context_length=len(context_tokens),
            chat_format=generation_config.chat_format,
            verbose=False,
            errors='replace'
        )

        if append_history:
            history.append((query, response))

        return response, history
本小节重点关注模型推理之前的 tokenizer 的过程, 因此需要继续深入 make_context 函数, 由于 chat 方法限制了 chat_format='chatml', 所以下面关于 make_context 的源码就只关注 chat_format='chatml' 这一情况:
def make_context(
    tokenizer: PreTrainedTokenizer,
    query: str,
    history: List[Tuple[str, str]] = None,
    system: str = "",
    max_window_size: int = 6144,  # 这个用于限制 system+history 占用的最大 token 数
    chat_format: str = "chatml",
):
    if history is None:
        history = []

    im_start, im_end = "<|im_start|>", "<|im_end|>"
    im_start_tokens = [tokenizer.im_start_id]
    im_end_tokens = [tokenizer.im_end_id]
    nl_tokens = tokenizer.encode("\n")

    # tokenizer.IMAGE_ST 就是与图片相关的特殊 token:
    # ["<img>", "</img>", "<ref>", "</ref>", "<box>", "</box>", "<imgpad>", "<quad>", "</quad>"]
    def _tokenize_str(role, content):
        return f"{role}\n{content}", tokenizer.encode(
            role, allowed_special=set(tokenizer.IMAGE_ST)
        ) + nl_tokens + tokenizer.encode(content, allowed_special=set(tokenizer.IMAGE_ST))

    system_text, system_tokens_part = _tokenize_str("system", system)
    system_tokens = im_start_tokens + system_tokens_part + im_end_tokens

    raw_text = ""
    context_tokens = []

    # 这里不要被 reversed 迷惑, 实际的 token 序列还是按照
    # system, turn-{i}, turn-{i+1}, ..., turn-{n}
    # 在历史对话合在一起都不超过最大长度的前提下 i=1, 否则会截取最近的 history
    for turn_query, turn_response in reversed(history):
        query_text, query_tokens_part = _tokenize_str("user", turn_query)
        query_tokens = im_start_tokens + query_tokens_part + im_end_tokens
        if turn_response is not None:
            response_text, response_tokens_part = _tokenize_str("assistant", turn_response)
            response_tokens = im_start_tokens + response_tokens_part + im_end_tokens
            next_context_tokens = nl_tokens + query_tokens + nl_tokens + response_tokens
            prev_chat = f"\n{im_start}{query_text}{im_end}\n{im_start}{response_text}{im_end}"
        else:
            next_context_tokens = nl_tokens + query_tokens + nl_tokens
            prev_chat = f"\n{im_start}{query_text}{im_end}\n"

        current_context_size = (
            len(system_tokens) + len(next_context_tokens) + len(context_tokens)
        )
        if current_context_size < max_window_size:
            context_tokens = next_context_tokens + context_tokens
            raw_text = prev_chat + raw_text
        else:
            break

    context_tokens = system_tokens + context_tokens
    raw_text = f"{im_start}{system_text}{im_end}" + raw_text
    context_tokens += (
        nl_tokens
        + im_start_tokens
        + _tokenize_str("user", query)[1]
        + im_end_tokens
        + nl_tokens
        + im_start_tokens
        + tokenizer.encode("assistant")
        + nl_tokens
    )
    raw_text += f"\n{im_start}user\n{query}{im_end}\n{im_start}assistant\n"

    return raw_text, context_tokens
tokenizer.encode 请参考下节
TL;DR, chatml 的格式是:
query = "how about 2+2?"
history = [
    ("1+1=?", "1+1=2")
]
system = "you are a helpful assistant"

# 换行符显式给出
"""
<|im_start|><"system" token_ids>\nyou are a helpful assistant<|im_end|>
\n<|im_start|><"user" token_ids>\n1+1=?<|im_end|>\n
<|im_start|><"assistant" token_ids>\n1+1=2<|im_end|>
\n<|im_start|><"user" token_ids>\nhow about 2+2?<|im_end|>\n
<|im_start|><"assistant" token_ids>\n
"""


# 换行符隐式给出
"""
<|im_start|>system
you are a helpful assistant<|im_end|>
<|im_start|>user
1+1=?<|im_end|>
<|im_start|>assistant
1+1=2<|im_end|>
<|im_start|>user
how about 2+2<|im_end|>
<|im_start|>assistant

"""
因此, 可以做 token 数量的计算, 首先我们发现这些“特殊”字符串在 QWen-VL 的 tokenizer 里都是单个 token
tokenizer.encode("system")    # [8948]
tokenizer.encode("assistant") # [77091]
tokenizer.encode("user")      # [872]
tokenizer.encode("\n")        # [198]

tokenizer.encode("ai")        # [2143]
tokenizer.encode("tool")      # [14172]
tokenizer.encode("function")  # [1688]
- 所以每句历史 (system/user/assistant) 都有 5 个 token 的 overhead (2 个
\n, 1 个角色, 1 个<|im_start|>以及 1 个<|im_end|>) - 用户问有 3 个 token 的 overhead, (1 个
<|im_start|>, 1 个"user"以及一个跟在"user"后面的\n)
(Ready) QWenTokenizer.tokenize
根据前一节关于 QWenLMHeadModel.chat 的分析, 在将 history 和 query 转换为模型的输入时, 会经历 tokenizer.encode 的过程, 而 huggingface transformers 中的 PreTrainedTokenizer 的封装, tokenizer.encode 的实际流程是:
def encode(self, ...):
    first_tokens = self.tokenize(text, **kwargs)
    # QWenTokenizer 对 convert_tokens_to_ids 的实现记为简单, 直接按字典查即可
    first_ids = self.convert_tokens_to_ids(first_tokens)
    # prepare_for_model 主要是做一些 padding 和 truncate, 以及补充一些特殊 token 的过程
    # 其中 padding 和 truncate 是标准化流程, 而 QWenTokenizer 没有重载补充特殊 token 的相关方法, 因此相当于只有 padding 和 truncate 的过程
    # 总之, prepare_for_model 在此处不予讨论
    return self.prepare_for_model(first_ids, second_ids, **kwargs)
总之, 只需关注 QWenTokenizer.tokenize 方法即可
例子
img_url = "https://qianwen-res.oss-cn-beijing.aliyuncs.com/Qwen-VL/assets/demo.jpeg"

# 仅用作对照
# 将<img>xxx</img> 以文本的方式 encode
token_ids = tokenizer.tokenizer.encode(
    f"Picture 1: <img>{img_url}</img>\n这是什么",
    allowed_special=set(["<img>", "</img>", "<ref>", "</ref>", "<box>", "</box>", "<imgpad>", "<quad>", "</quad>"])
)
tokens = tokenizer.convert_ids_to_tokens(token_ids)

# 这种方式是 QWenLMHeadModel 中的处理逻辑
# 将<img>xxx</img> 以图片的方式 encode
tokens_plus = tokenizer.tokenize(
    f"Picture 1: <img>{img_url}</img>\n这是什么",
    allowed_special=set(["<img>", "</img>", "<ref>", "</ref>", "<box>", "</box>", "<imgpad>", "<quad>", "</quad>"])
)
token_ids_plus = tokenizer.convert_tokens_to_ids(tokens_plus)

# 可以观察到两种方式对 <img>xxx</img> 中的 xxx 处理方式不一样
print(tokens)
print(tokens_plus)

# 验证其余部分完全一致
i, j = tokens.index("<img>"), tokens.index("</img>")
other_tokens = tokens[:i] + tokens[j+1:]

i_plus, j_plus = tokens_plus.index("<img>"), tokens_plus.index("</img>")
other_tokens_plus = tokens_plus[:i_plus] + tokens_plus[j_plus+1:]

print(all([a==b for a, b in zip(other_tokens, other_tokens_plus)]))  #  True
len(tokens_plus[i_plus+1:j_plus])  # 256, 一张图片转换为 256 个 token, 注意这 256 个 token 中可能有 <imgpad>
# 256 的含义实际上就是限制了 xxx 不能超过 256 个字节长度, 同时后续每张图片也占据这 256 个 token 位置

img_url = "https://qianwen-res.oss-cn-beijing.aliyuncs.com/Qwen-VL/assets/demo.jpeg"
bytes([x for x in token_ids_plus[i_plus+1:j_plus] if x != tokenizer.img_pad_id]).decode("utf-8") == img_url
源码
class QWenTokenizer(PreTrainedTokenizer)
    def tokenize(
        self,
        text: str,
        allowed_special: Union[Set, str] = "all",
        disallowed_special: Union[Collection, str] = (),
        **kwargs,
    ) -> List[Union[bytes, str]]:
        tokens = []
        text = unicodedata.normalize("NFC", text)

        # (源码注释) this implementation takes a detour: text -> token id -> token surface forms
        # 根据 huggingface PreTrainedTokenizer 的接口约定:
        #     tokenize 用于将原始字符串切分为 token 序列 (字符串序列)
        # PreTrainedTokenizer 最上层的对外接口是 __call__:
        #     而 __call__ 的执行逻辑是先调用 tokenize 方法, 再调用 convert_tokens_to_ids 方法
        # 这里由于 self.tokenizer 是 tiktoken.core.Encoding, 它只提供了 text -> token id 的接口, 所以只好迂回实现 tokenize 方法
        for t in self.tokenizer.encode(
            text, allowed_special=allowed_special, disallowed_special=disallowed_special
        ):
            tokens.append(self.decoder[t])

        def _encode_imgurl(img_tokens):
            assert img_tokens[0] == self.image_start_tag and img_tokens[-1] == self.image_end_tag
            img_tokens = img_tokens[1:-1]
            img_url = b''.join(img_tokens)
            # 这里的处理其实有些奇怪, 但不重要, 后续会再解码为<img>xx</img> 的 xx
            # 然后读取图片转换为图片特征后将这里占的 256 个 token 位置填充
            out_img_tokens = list(map(self.decoder.get, img_url))
            if len(out_img_tokens) > IMG_TOKEN_SPAN:
                raise ValueError("The content in {}..{} is too long".format(
                    self.image_start_tag, self.image_end_tag))
            # IMG_TOKEN_SPAN = 256
            out_img_tokens.extend([self.image_pad_tag] * (IMG_TOKEN_SPAN - len(out_img_tokens)))
            out_img_tokens = [self.image_start_tag] + out_img_tokens + [self.image_end_tag]
            return out_img_tokens

        return _replace_closed_tag(tokens, self.image_start_tag, self.image_end_tag, _encode_imgurl)

def _replace_closed_tag(
    input_tokens: List[Any],
    start_tags: Union[Any, Tuple[Any]],
    end_tags: Union[Any, Tuple[Any]],
    inclusive_replace_func: Callable,
    exclusive_replace_func: Callable = lambda x: x,
):
    if isinstance(start_tags, (str, int)):
        start_tags = (start_tags,)
    if isinstance(end_tags, (str, int)):
        end_tags = (end_tags,)
    assert len(start_tags) == len(end_tags)

    output_tokens = []
    end = 0
    while True:
        start = _list_find(input_tokens, start_tags, end)
        if start == -1:
            break
        output_tokens.extend(exclusive_replace_func(input_tokens[end : start]))
        tag_idx = start_tags.index(input_tokens[start])
        end = _list_find(input_tokens, (end_tags[tag_idx],), start)
        if end == -1:
            raise ValueError("Unclosed image token")
        output_tokens.extend(inclusive_replace_func(input_tokens[start : end + 1]))
        end += 1
    output_tokens.extend(exclusive_replace_func(input_tokens[end : ]))
    return output_tokens
(Alpha) QWenTokenizer.decode
可先参考下面的小节 QWenLMHeadModel.generate 的输出, decode 的过程比较简单, 只是会对 <img>xx</img> 做特殊的解码处理. (疑问: 输出文本里会出现这种输出吗? 即使有, 输出的 <img>xx</img> 序列里应该不出现 <imgpad> 吧)
TODO: 搞个测试问题, 输入两张图片, 问哪张有猫, 观察下模型的输出
model
(TODO) 图解 QWen-VL 推理流程
本节是此篇博客的关于 tokenizer 与 inference 的浓缩版本
(Ready) Overview: QWenLMHeadModel.generate
我们回到 QWenLMHeadModel.chat 的内部, 先看一下 QWenLMHeadModel.generate 的最终输出:
# s, context_tokens = make_context(
#     tokenizer=tokenizer,
#     query="how about 2+2",
#     history=[("1+1=?", "1+1=2")],
#     system="you are a helpful assistant",
#     max_window_size=6144,
#     chat_format="chatml",
# )

# context_tokens 由上面得来
context_tokens = [151644, 8948, 198, 9330, 525, 264, 10950, 17847, 151645, 198, 151644, 872, 198, 16, 10, 16, 19884, 151645, 198, 151644, 77091, 198, 16, 10, 16, 28, 17, 151645, 198, 151644, 872, 198, 5158, 911, 220, 17, 10, 17, 151645, 198, 151644, 77091, 198]
input_ids = torch.tensor([context_tokens]).to(model.device)
stop_words_ids = [[tokenizer.im_end_id], [tokenizer.im_start_id]]
generation_config = model.generation_config

outputs = model.generate(
    input_ids,
    stop_words_ids=stop_words_ids,
    return_dict_in_generate=False,
    generation_config=generation_config,
    # **kwargs,
)
我们继续观察 outputs
print(outputs)
# 输出:
# tensor([[151644,   8948,    198,   9330,    525,    264,  10950,  17847, 151645,
#             198, 151644,    872,    198,     16,     10,     16,  19884, 151645,
#             198, 151644,  77091,    198,     16,     10,     16,     28,     17,
#          151645,    198, 151644,    872,    198,   5158,    911,    220,     17,
#              10,     17, 151645,    198, 151644,  77091,    198,     17,     10,
#              17,     28,     19, 151645, 151643]], device='cuda:0')

new_tokens: List[int] = outputs.detach().cpu().tolist()[0][len(context_tokens):]
# tokenizer.decoder: Dict[int, Union[str, bytes]] 在 QWenTokenizer.__init__ 中构造(前面的小节略过这一点)
# 包含了所有 token 到 token_id 的映射 (含所有的 217 个特殊 token)
print([tokenizer.decoder[token_id] for token_id in new_tokens])

# 输出:
# [b'2', b'+', b'2', b'=', b'4', '<|im_end|>', '<|endoftext|>']
huggingface transformers notes
huggingface transformers 上的生成式模型 (精确地说是: 继承自 PreTrainedModel, 且 cls.can_generate()==True 的类), 例如: GPT2LMHeadModel, 从 API 的定义来看
__call__方法: (因为继承自torch.nn.Module, 所以也基本上是forward方法, 而forward方法是必须有特定的具体实现) 的输入假设是(B, L), 输出会是(B, L, V).generate方法: 假设输入是(B, L), 输出一般是(B, L+L2).generate方法会多次调用__call__方法, 因此generate函数才是面向用户的上层 API
备注: 所谓 cls.can_generate(), 实际上
class PreTrainedModel(nn.Module, ModuleUtilsMixin, GenerationMixin, PushToHubMixin, PeftAdapterMixin):
    # 其实就是检测是否重载了 prepare_inputs_for_generation 和 generate 方法
    # 一般情况下, 子类只会重载 prepare_inputs_for_generation 方法
    @classmethod
    def can_generate(cls) -> bool:
        if "GenerationMixin" in str(cls.prepare_inputs_for_generation) and "GenerationMixin" in str(cls.generate):
            return False
        return True
然而在 QWenLMHeadModel 里, 它直接重载了 generate 方法, 而暴露给用户的接口是 chat 方法. 我们后面会看到, QWenLMHeadModel.generate 实际上还是利用了 super().generate(**kwargs) 的, 因此 QWenLMHeadModel.generate 其实还是在内部多次调用了 QWenLMHeadModel.__call__
QWenLMHeadModel.chat
我们再回顾一下 QWenLMHeadModel.chat, 这次我们不关注 tokenizer encode 和 decode 的过程
class QWenLMHeadModel(QWenPreTrainedModel):
    def chat(
        self,
        tokenizer: PreTrainedTokenizer,
        query: str,
        history: Optional[HistoryType],
        system: str = "You are a helpful assistant.",
        append_history: bool = True,
        stream: Optional[bool] = _SENTINEL,
        stop_words_ids: Optional[List[List[int]]] = None,
        generation_config: Optional[GenerationConfig] = None,
        **kwargs,
    ) -> Tuple[str, HistoryType]:
        generation_config = generation_config if generation_config is not None else self.generation_config
        # ...
        outputs = self.generate(
            input_ids,   # 形状是 (1, L), 注意 chat 方法不能批量处理
            stop_words_ids=stop_words_ids,
            return_dict_in_generate=False,
            generation_config=generation_config,
            **kwargs,
        )
        # ...
QWenLMHeadModel.generate
接下来, 我们深入看 QWenLMHeadModel.generate 源码
class QWenLMHeadModel(QWenPreTrainedModel):
    def generate(
        self,
        inputs: Optional[torch.Tensor] = None,
        generation_config: Optional[GenerationConfig] = None,
        logits_processor: Optional[LogitsProcessorList] = None,
        stopping_criteria: Optional[StoppingCriteriaList] = None,
        prefix_allowed_tokens_fn: Optional[
            Callable[[int, torch.Tensor], List[int]]
        ] = None,
        synced_gpus: Optional[bool] = None,
        assistant_model: Optional["PreTrainedModel"] = None,
        streamer: Optional["BaseStreamer"] = None,
        **kwargs,
    ) -> Union[GenerateOutput, torch.LongTensor]:
        generation_config = generation_config if generation_config is not None else self.generation_config

        stop_words_ids = kwargs.pop("stop_words_ids", None)
        if stop_words_ids is None and generation_config is not None:
            stop_words_ids = getattr(generation_config, "stop_words_ids", None)
        if stop_words_ids is None:
            stop_words_ids = getattr(generation_config, "stop_words_ids", None)

        if stop_words_ids is not None:
            # stop_word_ids 默认是 [[tokenizer.im_end_id], [tokenizer.im_start_id]]
            # 也就是 [['<|im_start|>'], ['<|im_end|>']]
            stop_words_logits_processor = StopWordsLogitsProcessor(
                stop_words_ids=stop_words_ids,
                eos_token_id=generation_config.eos_token_id,  # 这个 eos_token_id=151643 对应的是 '<|endoftext|>'
            )
            # 注意 StopWordsLogitsProcessor 是 QWen-VL 自定义的一个类
            if logits_processor is None:
                logits_processor = LogitsProcessorList([stop_words_logits_processor])
            else:
                logits_processor.append(stop_words_logits_processor)

        return super().generate(
            inputs,
            generation_config=generation_config,
            logits_processor=logits_processor,
            stopping_criteria=stopping_criteria,
            prefix_allowed_tokens_fn=prefix_allowed_tokens_fn,
            synced_gpus=synced_gpus,
            assistant_model=assistant_model,
            streamer=streamer,
            **kwargs,
        )
可以看出, QWenLMHeadModel 重载的 generate 方法的本质只是预先增加了个 StopWordsLogitsProcessor, 而 StopWordsLogitsProcessor 的 __call__ 方法很简单, 就是一旦当前的序列 input_ids 匹配上 stop_words_ids 序列, 就将当前 logit 的 eos_token_id 那一项的值置为一个非常大的数值, 这样将导致 generate 方法会在执行 input_ids = input_ids + [next_token_id] 后返回. 因此在前面的例子中:
# generate 的输出是
[*prefix, b'2', b'+', b'2', b'=', b'4', '<|im_end|>', '<|endoftext|>']

# 原因是当输入序列是 [..., '<|im_end|>'] 时, 会再进入一次前向计算(其实可以说是多余的)
# 而这时 input_ids 匹配上了结束序列, 于是 StopWordsLogitsProcessor 将本次的 logits 中 eos_token_id 那一项的值置为很大
# 因此 next_token_id = '<|endoftext|>' 对应的 token id
# 然后执行 input_ids += [next_token_id]
# 在下一次 while xxx 检查时跳出循环, 之后函数返回
# 因此最终的序列是 [..., '<|im_end|>', '<|endoftext|>']
huggingface transformers note: StopWordsLogitsProcessor 继承自 transformers.generation.LogitsProcessor, 在 generate 方法中用于每一步修正输出的 logit (形状是 (B, V), 其中 B 是 batch size, V 是词表大小), 继而影响采样概率
由于 QWenLMHeadModel 重载的 generate 方法最终还是使用的 super().generate(...), 因此实际上只需要重点关注 QWenLMHeadModel.forward 即可
QWenLMHeadModel.forward
class QWenLMHeadModel(QWenPreTrainedModel):
    # self.transformer: QWenModel
    transformer_outputs = self.transformer(...)
    hidden_states = transformer_outputs[0]
    # self.lm_head: Linear(4096, vocab_size=151936, bias=False)
    # 不与 embedding 层共享权重
    lm_logits = self.lm_head(hidden_states)
    return ...
(Ready) QWenModel.forward
将 QWenModel.forward 拆解开, 忽略 generate 时涉及的 past_key_values 的逻辑 (past_key_values 的逻辑在 T5 博客中关于 generate 函数里有充分讨论, 这里不赘述)
# step 1: 将 input_ids 进行预处理, 就是将 image token 的占位符替换为 self.visual.encode(images)
# input_ids: (B, L)
if torch.any(input_ids == self.config.visual["image_start_id"]):
    bos_pos = torch.where(input_ids == self.config.visual['image_start_id'])
    eos_pos = torch.where(input_ids == self.config.visual['image_start_id'] + 1)
    # bos_pos (tuple of tensors): 形状: (M,), (M,)
    # 例如: B=2, bos_pos = (tensor([0, 0, 1]), tensor([10, 678, 20]))
    # 表示第 0 个 prompt 中包含两张图片, 第 1 个 prompt 中包含 1 张图片
    # eos_pos = ((tensor([0, 0, 1]), tensor([10+257, 678+257, 20+257]))

    # img_pos: (M, 3)
    img_pos = torch.stack((bos_pos[0], bos_pos[1], eos_pos[1]), dim=1)
    images = []
    for i, a, b in img_pos:
        # 此处可能官方代码有误, 应该改为 [a+1:b]
        image = input_ids[i][a + 1 : b - 1].tolist()
        image = image[ : image.index(self.config.visual['image_start_id'] + 2)]
        images.append(bytes(image).decode('utf-8'))
    # input: List[str], output: [M, 256, C=4096]
    images = self.visual.encode(images)
else:
    images = None

# self.wte: nn.Embedding(self.vocab_size=151936, self.embed_dim=4096)
# 小细节: tokenizer 的词表长度为: 151643+217 = 151860, 而这个 embedding 层还额外留了 76 个词的空间
hidden_states = self.wte(input_ids)  # hidden_states: (B, L, 4096)
hidden_states = self.drop(hidden_states)
if images is not None:
    for idx, (i, a, b) in enumerate(img_pos):
        hidden_states[i][a + 1 : b] = images[idx]

# step 2: 正式开始前向计算过程:
kv_seq_len = hidden_states.size()[1]  # 忽略加上 past_key_values 长度的细节
if (
    self.use_dynamic_ntk  # True
    and kv_seq_len == hidden_states.size()[1]  # generate 最开始时会返回 True, 后续会返回 False
    and not self.training  # inference 时如果超长可以采用长度外推的做法
):
    # self.seq_length = 2048
    # 假设 kv_seq_len < 2048, context_value<1, ntk_alpha = 1
    # 假设 kv_seq_len = 4096, 长度扩大 2 倍, context_value=2, ntk_alpha = 3
    # 假设 kv_seq_len = 9192, 长度扩大 4 倍, context_value=3, ntl_alpha = 7
    context_value = math.log(kv_seq_len / self.seq_length, 2) + 1
    ntk_alpha = 2 ** math.ceil(context_value) - 1
    ntk_alpha = max(ntk_alpha, 1)
else:
    ntk_alpha = self.rotary_emb._ntk_alpha_cached

# self.rotary_emb: RotaryEmbedding(dim=128=4096/32, base=10000), 见下文
# rotary_pos_emb=(cos, sin), shape 均为: (1, kv_seq_len, 1, dim=128)
rotary_pos_emb = self.rotary_emb(kv_seq_len, ntk_alpha=ntk_alpha)

# self.h = nn.ModuleList([QwenBlock(config) for i in range(config.num_hidden_layers)])
# config.num_hidden_layers = 32
for block in self.h:
    # self.ln_1: RMSNorm
    layernorm_output = block.ln_1(hidden_states)  # hidden_states: (B, L, 4096)
    # block.attn: QWenAttention: 见下文
    attn_outputs = block.attn(layernorm_output, rotary_pos_emb)
    # attn_output: (B, L, num_heads*head_dim)
    attn_output = attn_outputs[0]
    layernorm_input = attn_output + hidden_states

    # block.ln_2: RMSNorm
    layernorm_output = block.ln_2(layernorm_input)
    # block.mlp: QWenMLP: 见下文
    mlp_output = block.mlp(layernorm_output)
    hidden_states = layernorm_input + mlp_output

# self.ln_f: RMSNorm
hidden_states = self.ln_f(hidden_states)  # (B, L, num_heads, head_dim)
hidden_states = hidden_states.view(output_shape)  # (B, L, 4096)
return hidden_states, ...
(Ready) RotaryEmbedding
Qwen 采用了 RoPE 位置编码, 并在推理时应用了外推技术:
原本的 RoPE 位置编码方案是, 计算得到 $Q, K, V $ 之后 (在 QWen-VL 中, 形状为 (B, num_heads=32, L<=max_length=2048, head_dim=d=128)), 忽略 (B, num_heads) 这两维, RoPE 编码前是需要先对 $Q, K$ 做变换, 然后对 $Q, K, V$ 执行正常的 scaled inner product self attention.
假设 $\mathbf{q}\in\mathbb{R}^{d=128}$ 是在位置 $m$ 处的 query 表示 (也就是 $Q$ 的第 $m$ 行), 执行的变换为:
\[\begin{align} \mathbf{q}' &:= [-q_{d/2+1}, -q_{d/2+2}, ..., -q_{d}, q_1, q_2, q_{d/2}]^T\\ \text{rotary}(\mathbf{q}, m)&=\begin{bmatrix} \cos(m[\frac{1}{\text{base}^{2/d}}]^{0})\\ \cos(m[\frac{1}{\text{base}^{2/d}}]^{1})\\ \vdots\\ \cos(m[\frac{1}{\text{base}^{2/d}}]^{d/2-1})\\ \cos(m[\frac{1}{\text{base}^{2/d}}]^{0})\\ \cos(m[\frac{1}{\text{base}^{2/d}}]^{1})\\ \vdots\\ \cos(m[\frac{1}{\text{base}^{2/d}}]^{d/2-1})\\ \end{bmatrix} \odot \mathbf{q} + \begin{bmatrix} \sin(m[\frac{1}{\text{base}^{2/d}}]^{0})\\ \sin(m[\frac{1}{\text{base}^{2/d}}]^{1})\\ \vdots\\ \sin(m[\frac{1}{\text{base}^{2/d}}]^{d/2-1})\\ \sin(m[\frac{1}{\text{base}^{2/d}}]^{0})\\ \sin(m[\frac{1}{\text{base}^{2/d}}]^{1})\\ \vdots\\ \sin(m[\frac{1}{\text{base}^{2/d}}]^{d/2-1})\\ \end{bmatrix} \odot \mathbf{q}' \end{align}\]注意 QWen 的 RoPE 实现与常见的实现略有不同, QWen 采用的是 $q_i$ 与 $q_{i+d/2}$ 配对旋转 $\theta_i$
其中 $\text{base}=10000$, 而 Qwen-VL 采用的外推策略是: 假设推理时的序列长度超过了 max_length=2048, 则将 $\text{base}$ 扩大一些, 假设需要扩大的倍数为 $k$, 也就是扩大到 $k*\text{max_length}$ (在实现上, RotaryEmbedding 缓存了当前的最大长度, 一旦超长就会将长度扩大为超长长度的 2 倍, 而如果下次推理时长度不需要那么长, 又会将 $\text{base}$ 复原, 这些细节在后面的代码里会有所体现)
接下来看具体的代码实现
from einops import rearrange
class RotaryEmbedding(torch.nn.Module):
    def __init__(self, dim, base=10000):
        super().__init__()
        self.dim = dim
        self.base = base
        self.inv_freq = 1.0 / (base ** (torch.arange(0, dim, 2).float() / dim))
        self._rotary_pos_emb_cache = None
        self._seq_len_cached = 0
        self._ntk_alpha_cached = 1.0

    def update_rotary_pos_emb_cache(self, max_seq_len, offset=0, ntk_alpha=1.0):
        seqlen = max_seq_len + offset
        if seqlen > self._seq_len_cached or ntk_alpha != self._ntk_alpha_cached:
            base = self.base * ntk_alpha ** (self.dim / (self.dim - 2))
            self.inv_freq = 1.0 / (base ** (torch.arange(0, self.dim, 2, device=self.inv_freq.device).float() / self.dim))
            # 扩大到目标长度的两倍
            self._seq_len_cached = max(2 * seqlen, 16)
            self._ntk_alpha_cached = ntk_alpha
            seq = torch.arange(self._seq_len_cached, device=self.inv_freq.device)
            # freqs: (self._seq_len_cached=2*seqlen, self.dim/2=64)
            # freqs: [
            #     [0*theta0, 0*theta1, ..., 0*theta_d_half_minus_1],
            #     [1*theta0, 1*theta1, ..., 1*theta_d_half_minus_1],
            #     ...
            #     [2*seqlen*theta0, 2*seqlen*theta1, ..., 2*seqlen*theta_d_half_minus_1]
            # ]
            freqs = torch.outer(seq.type_as(self.inv_freq), self.inv_freq)
            # emb: (self._seq_len_cached=2*seqlen, self.dim=128)
            emb = torch.cat((freqs, freqs), dim=-1)
            emb = rearrange(emb, "n d -> 1 n 1 d")

            cos, sin = emb.cos(), emb.sin()
            self._rotary_pos_emb_cache = [cos, sin]

    # 在 QWenModel 中, 调用的 offset 实参均为 0
    def forward(self, max_seq_len, offset=0, ntk_alpha=1.0):
        self.update_rotary_pos_emb_cache(max_seq_len, offset, ntk_alpha)
        # cos, sin: (1, self._seq_len_cached, 1, self.dim=128), 但注意它是从 (theta0~theatd_half, theta0~thetad_half)
        cos, sin = self._rotary_pos_emb_cache
        # returns:  (1, self.max_seq_len, 1, self.dim=128)
        return [cos[:, offset : offset + max_seq_len], sin[:, offset : offset + max_seq_len]]
(Ready) QWenAttention
def forward(hidden_states, rotary_pos_emb):
    # hidden_states: (B, L, 4096), rotary_pos_emb: (cos, sin), 均为: (1, L, 1, dim=128), num_heads=32
    # sin[0, i, 0, k] = sin(i*theta_k), k < 64; sin[0, i, 0, k] = sin(i*theta_{k-64})

    # self.c_attn: torch.nn.Linear(4096, 3*4096)
    mixed_x_layer = self.c_attn(hidden_states)
    query, key, value = mixed_x_layer.split(config.hidden_state, dim=2)

    # (B, L, 4096) -> (B, L, 32, 128)
    query = self._split_heads(query, self.num_heads, self.head_dim)
    key = self._split_heads(key, self.num_heads, self.head_dim)
    value = self._split_heads(value, self.num_heads, self.head_dim)

    query = apply_rotary_pos_emb(query, rotary_pos_emb)
    key = apply_rotary_pos_emb(key, rotary_pos_emb)

    query = query.permute(0, 2, 1, 3)  # (B, L, 32, 128) -> (B, 32, L, 128)
    key = key.permute(0, 2, 1, 3)      # (B, L, 32, 128) -> (B, 32, L, 128)
    value = value.permute(0, 2, 1, 3)  # (B, L, 32, 128) -> (B, 32, L, 128)

    # 普通的 scale_dot_product_attention
    attn_output = scale_dot_product_attention(query, key, value)  # (B, 32, L, 128)
    attn_output = attn_output.transpose(1, 2).view(B, L, 4096)
    return (attn_output, ...)

def apply_rotary_pos_emb(query, rotary_pos_emb):
    # query: (B, L, 32, 128)
    # rotary_pos_emb: (cos, sin), 均为: (1, L, 1, dim=128), num_heads=32, (theta0~thetad/2, theta0_thetad/2)
    x0, x1 = query.split(self.head_dim//2, dim=2)
    query_rotate = torch.cat([-x1, x0], dim=-1)
    cos, sin = rotary_pos_emb
    return query * cos + query_rotate * sin
(Ready) QWenMLP
# intermediate_size: 22016
# w1, w2: nn.Linear(4096, intermediate_size/2=11008)
a1 = self.w1(hidden_states)
a2 = self.w2(hidden_states)
intermediate_parallel = a1 * F.silu(a2)
# self.c_proj: nn.Linear(config.intermediate_size // 2, 4096)
output = self.c_proj(intermediate_parallel)
return output
VisionTransformer: QWenLMHeadModel.transformers.encode
(Ready) VisionTransformer 整体的输入输出
QWenLMHeadModel.generate 方法对图片的处理如下
# model: QWenLMHeadModel
# model.transformers.visual: VisionTransformer
res = model.transformer.visual.encode(["https://qianwen-res.oss-cn-beijing.aliyuncs.com/Qwen-VL/assets/demo.jpeg"])
res.shape  # [1, 256, C=4096]
为进一步分析, 我们将 model.transformer.visual.encode(["demo.jpeg"]) 的打开:
# visual.py 是 QWen-VL huggingface hub 中的文件
from visual import VisionTransformer
from torchvision import transforms
from PIL import Image

image_paths = ["demo.jpeg"]

model = VisionTransformer(
    image_size=448,
    patch_size=14,
    width=1664,
    layers=48,  # 为了简单测试一下, 可以将其调整为 2
    heads=16,
    mlp_ratio=4.9231,
    n_queries=256,
    output_dim=4096
)

mean = (0.48145466, 0.4578275, 0.40821073)
std = (0.26862954, 0.26130258, 0.27577711)
image_transform = transforms.Compose([
    transforms.Resize(
        (image_size, image_size),
        interpolation=InterpolationMode.BICUBIC
    ),
    transforms.ToTensor(),
    transforms.Normalize(mean=mean, std=std),
])

images = []
for image_path in image_paths:
    image = Image.open(image_path)
    image = image.convert("RGB")
    image = image_transform(image)  # torch.tensor, shape: [3, 448, 448]
    images.append(image)
images = torch.stack(images, dim=0)  # [B=1, 3, 448, 448]: VisionTransformer 模型的输入形状
res = model(images)
print(res.shape)  # [B=1, 256, C=4096]: VisionTransformer 模型的输出形状
(Ready) VisionTransformer 的模型结构细节
这里直接将 VisionTransformer 的 forward 函数拆解开
# ================= VisionTransformer =================
# inputs: (B, 3, image_size=448, image_size=448)
# grid_size = 14
x = self.conv1(inputs)  # stride=grid_size, x: (B, width=1664, 32, 32)
x = x.resape(x.shape[0], x.shape[1], -1).permute(0, 2, 1)  # (B, 1024, 1664)
# self.positional_embedding: shape (256, width) 是可学习的绝对位置编码
# get_abs_pos 实际上对 self.postional_embedding 做了插值(转换回二维使用 bicubic)处理
x = x + get_abs_pos(self.positional_embedding, x.size(1))
x = self.ln_pre(x)  # self.ln_pre: layernorm
for block in self.transformer:  # 48 layer
    # 使用了 pre-layernorm 的模式, block.attention 使用的是最朴素的 scale dot product self-attention (num_heads=16, head_dim=104), 最后再加一个线性层
    x += block.attention(block.ln_1(x))
    # mlp 的结构是 linear(1664, 8192) -> GELU -> linear(8192, 1664)
    x += block.mlp(block.ln_2(x))
# self.atten_pool: Resampler, 论文中称之为 VL Adapter
x = self.attn_pool(x)  # x: (B, 1024, 1664) -> (B, 256, output_dim=4096)
x = self.ln_post(x)
x = x @ self.proj      # self.proj.shape: (output_dim=4096, output_dim=4096)
return x    # (B, 256, output_dim=4096)

# ================ Resampler (VL Adapter) =================
# self.atten_pool(x) 的具体流程
x = self.atten_pool.kv_proj(x)  # linear: (width=1664, output_dim=4096), x: (B, 1024, 4096)
x = self.atten_pool.ln_kv(x)    # layernorm
x = x.permute(1, 0, 2)          # (1024, B, 4096)
B = x.shape[1]                  # B
q = self.ln_q(self.query)       # self.query: (256, 4096) 可学习参数, self.ln_q: layernorm
# self.attn = torch.nn.MultiheadAttention(4096, num_heads=32)
# 注意: self.attn 中包含 Q, K, V 的映射矩阵, 且做完 attention 后, 还经过了一个 (4096, 4096) 的线性层, TODO: 核验具体计算逻辑, Pytorch 文档对此似乎语焉不详
attn_output, attn_output_weights = self.attn(
    # self.pos_embed 是 (256, 4096) 固定的 buffer, 类似原始 transformer 的绝对位置编码
    q.unsqueeze(1).repeat(1, B, 1) + self.pos_embed.unsqueeze(1),  # (256, B, 4096)
    x + get_abs_pos(self.pos_embed, x.shape[0]).unsqueeze(1),      # 插值: (1024, B, 4096)
    x,  # (1024, B, 4096)
)  # atten_output: (256, B, 4096)
return attn_output.permute(0, 1, 2)  # (256, B, 4096) -> (B, 256, 4096)
模型参数量
可以统计到, QWen-VL 的模型参数主要包含这些部分, M 代表 10 的 6 次方:
- QWen-VL: 9657 M
    - QWen: 7721.39 M
        - lm_head: 622.33 M
        - embedding: 622.33 M
        - 32 * layer: 6476.66 M = 32 * 202.39565 M
        - ...
    - VisualTransformer: 1935.61 M
        - adapter: 76.05 M
        - 48 * layer: 1841.362944 M = 48 * 38.361728 M
        - ...
统计代码参考:
from accelerate import init_empty_weights
from transformers import AutoModelForCausalLM, AutoTokenizer, AutoConfig
config = AutoConfig.from_pretrained("Qwen/Qwen-VL-Chat", trust_remote_code=True, num_hidden_layers=32)

with init_empty_weights():
    model = AutoModelForCausalLM.from_config(config)

def get_num_parameters(m):
    return sum(p.numel() for p in m.parameters()) / 1000 / 1000

print("QWen-VL:", get_num_parameters(model))
print("QWen:", get_num_parameters(model) - get_num_parameters(model.transformer.visual))
print("QWen/lm_head:", get_num_parameters(model.lm_head))
print("QWen/embedding:", get_num_parameters(model.transformer.wte))
print("QWen/layers[0]:", get_num_parameters(model.transformer.h[0]))
print("VisualTransformer:", get_num_parameters(model.transformer.visual))
print("VisualTransformer/adapter:", get_num_parameters(model.transformer.visual.attn_pool))
print("VisualTransformer/layer[0]:", get_num_parameters(model.transformer.visual.transformer.resblocks[0]))
输出
QWen-VL: 9656.935168
QWen: 7721.324544
QWen/lm_head: 622.3298560000001
QWen/embedding: 622.3298560000001
QWen/layers[0]: 202.395648
VisualTransformer: 1935.6106240000001
VisualTransformer/adapter: 76.054528
VisualTransformer/layer[0]: 38.361728
train
本节主要涉及对 QWen-VL 论文的内容
(Alpha) 一些图像-文本多模态任务
VQA 任务: 模型的输入是一张图片(图像)和一个问题(文字), 输出是答案(文字). 例如, 输入: 问题:图片中有多少个苹果?图像:一张图片,其中有五个苹果。期望的输出:图片中有五个苹果. 早先的 VQA 任务通常是在一个大批量的 (问题,图像,答案) 三元组上进行训练, 然后对与训练集比较类似的 (问题,图像) 二元组测试集上进行测试
Zero-Shot VQA 任务: 模式上与 VQA 任务一致, 只是测试集是开放域的
image caption 任务: 模型的输入是一张图片(图像), 输出是对图片的描述(文字). 例如, 输入: 图像: 一只在阳光下打盹的猫的图片, 输出: 一只猫在阳光下打盹.
visual grounding 任务: 模型的输入是一张图片(图像), 以及一个问题或一句话(文字), 输出是这句话中涉及到的图片中的物体的 bounding box. 例如, 输入: 图像: 一个桌子上放着一个香蕉和苹果的图片, 文字: 拿一下桌子上香蕉的旁边的苹果, 输出: [((0, 500), (999, 999)), ((300, 480), (320, 499)), ((340, 481), (360, 497))], 分别代表: “桌子”, “香蕉”, “苹果” 这几个物体的边界框
训练过程
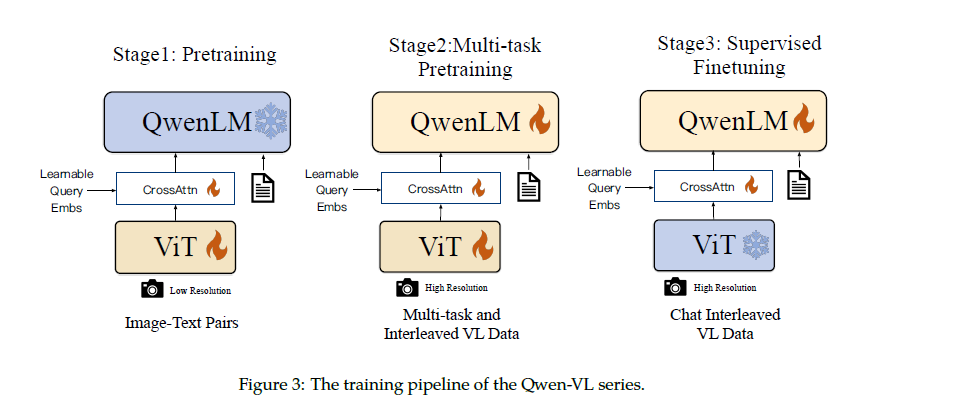
参照原始论文, 分为 3 个阶段, 将模型参数分为 3 部分: ViT, adapter, QWenLM, 其中 ViT 部分使用 Openclip ViT-bigG 模型参数初始化, QWenLM 使用 QWen-7B 模型初始化, adapter 参数随机初始化.
Stage 1 (原文称作 Pretraining): 固定住 QWenLM 的参数, 微调 adapter 和 ViT 的参数. 搜集一些图像文本对数据, 猜测应该是按 <img>xxx</img>yzw 的格式, 然后使用正常的 loss 对文本部分 yzw 计算损失. 注意这一步微调过程中, 图像是被缩放至 224x224 进行的.
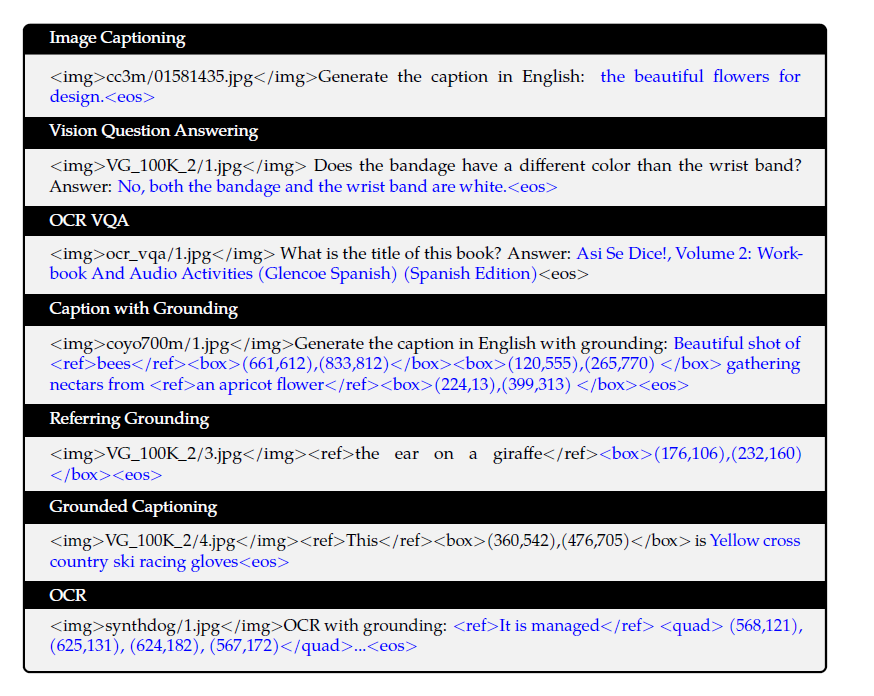
Stage 2 (原文称作 Multi-Task Pretraining): 全参数微调. 进行下图中的几类任务的训练, 蓝色字体部分需要计算损失. 注意这个过程中, 图像是被缩放至 448x448 进行的 (这也是最终用作推理时的图像分辨率). 另外, 作者提到了在这一步训练时会将同类任务的数据打包在一起拼接至 2048 长度训练, 由此推测的训练数据格式是: <img>xxx</img>Generate the caption in English: This is a dog.<img>yyy</img>Generate the caption in English: This is a cat.<eos>, 损失则只对 This is a dog. 和 This is a cat.<eos> 计算. 这一步训练结束后的模型称为 QWen-VL
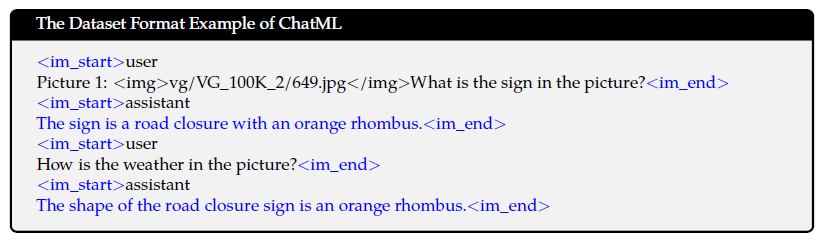
Stage 3 (原文称作 Supervised Fine-tuning): 固定住 ViT, 微调 adapter 和 QWenLM 参数, 按下图的方式使用对话格式数据进行训练, 其中蓝色字体计算损失, 这一步训练结束后的模型称为 QWen-VL-Chat
总结